(Last Revised on Sep / 3 /2012)
 If you are to drop over $1000-$1200 for a custom computer it’d better be worth every buck spent, every single one of it (since otherwise that could have served you over 100 packs of delicious beef jerky, and beef jerky is good, like bacon!).
This computer should be the workstation that can stand on top of all tasks it’s assigned, never gives you up and lets you down in any serious gaming nights. It must be the custom computer you proudly sign your bragging rights form and introduce to your dear parent.
You will use this computer to do high-resolution graphics design, your super quality photos editing, your 1080p movie projects, and other resource-intense works. You will also be able run dual or triple (Radeon) screen setup to tackle multitasking at its finest. You will also play your games at the the most beautiful settings possible.
So, with the unusual high expectation set, let’s shop!
1.Processor
The $800 / $900 Custom Pure Gaming PC Build last week made many gamers very happy, and it is equipped with the decent i5-2500k that carries great unlocked potential. In this system, we will stray away from the mainstream Intel 1155-socket CPUs a little bit. They are awesome processors for power users and overclockers alike, with an impressive level of performance per core. However in this rig, we will tap into the different world of processing power – Intel socket 2011 CPUs.

As mention in Choosing an AMD or Intel Processor ?, these 2011-socket processors belong to top-of-the-line offerings to enthusiast users. I’d like you to meet the Intel Core i7 – 3820 processor, the best bang for the bucks chipset on the market as of mid-2012 ! (it might still be a few years from now, children of the future will let us know)
If you have heard of the cherry-picked Intel i7-2700k Sandy Bridge CPU, you probably know how powerful it is and how good it could be for overclocking. Then you might also know about the Intel i7-3770k Ivy Bridge CPU that just came out recently (apr 2012). They are both superb candidates for a high-end system, but there are many reasons that we will stick with the i7-3820, and here is why :
1. Price : at the time of this writing, the i7-2700k runs for ~$310 while the i7-3770k is still around $350 range. The i7-3820 is approximately $290.
2. Performance : the i7-3820 performs a little faster than the i7-2700k but takes the passenger seat to i7-3770k. All three processors are quad-core with hyper-threading that creates four more logical cores to increase processing lanes. Thus, realistically you find very small difference among the three in most games and professional applications. AMD does contribute pretty nice multicore processors as well (FX-8150 and FX-8120), however due to its lack of power for such purpose of this configuration, I have to set it aside (sorry! i promise we’ll look into this CPU for the next pure server build :( )
Update 7/29/2012 : I keep my promise, here you go $700 / $1000 Super Quiet Custom Home Server
Now when we put both price vs. performance next to each other, you should have realized the reason you should go with this 2011-socket cpu.
The Intel Core i7 3820 clearly has the cost advantage, while it also positions your system right into the sweetest spot for a strong performance system.
After that let’s look at the third factor, and is also the most important reason that has we set our mind on a 2011-socket.
3. There might be a question about i7-3820 vs. i7-2600k. If there is small performance difference lays between these i7 processors and the i7-2600k is also cheaper, why shouldn’t the system be paired with i7-2600k instead? Because we must also look at the overall power of the computer as a whole, not just one core component itself. The 2011 platform is different to 1155 for a reason.
The essential upgrade is credited for the super quad channel (4) over dual channel (2) memory bandwidth in 1155-socket. You get three times better memory speed and performance, which is the ideal upper hand for workstation machines. Therefore, the i7-3820 equips you with the greater technology plus more solid performance. On the long run it outdoes what the i7-2600k or the 1155-socket processors can offer you.
2.Motherboard

It is easy to pick up a 2011-socket motherboard since there are not many thousands options like its sibling, the 1155-socket. In the motherboard market, sometimes spending more does not guarantee you a faster motherboard or it will perform much better than one another.
You are more likely to pay for the additional features such as more SATA ports, more USB 3.0 ports, different Audio chipset or LAN controller. Sometimes it could be the overall design; for example the thermal armor in the Sabertooth motherboards that gives a higher reliability during high-load or long-term overlocking. Sometimes, it could be the extra ethernet port or wireless and bluetooth adapters. These features can be added in the future, therefore it’s more important to strip down all the unnecessary accessories and focus on the main fundamentals for now.
The ASUS P9X79 LGA 2011 X79 motherboard is one of the fastest motherboards you can find. It gathers alot of interesting features of a high-end workstation board.
She comes with top heatsink onVoltage regular modules (VRM) line where it helps stabilize power current to the CPU and aids with some overclocking on the i7-3820. The first two PCIe x16 slots can run at full x16 mode to gain you the best bandwidth on high-end graphics card in either SLI or Crossfire setup. There is also a healthy amount of SATA / eSATA ports as well as USB 3.0 for internal and peripheral devices.
The most beneficial bonus is the support of 1866MHz memory with 8 DIMM Slots that give you a whopping 64GB max capacity. The remarkable performance of quad channel will kick in when you drop four memory modules into each same color DIMM slot. Now with this motherboard as the foundation, we can move on to select the rest of the hardware that will make this PC truly yours.
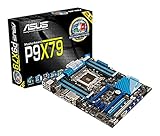 ASUS P9X79 LGA 2011 Intel X79 SATA 6Gb/s USB 3.0 ATX Intel Motherboard
- 8 x DIMM Slots, Quad-channel DDR3 2400(O.C.)/2133(O.C.)/1866/1600/1333/1066 MHz Support
- Digital 8+2 Phase Power Design
- 2 x PCIe 3.0 x16 (dual@x16)
- AMD Quad-GPU CrossFireX and NVIDIA Quad-GPU SLI support
 ASUS Sabertooth X79 LGA 2011 Intel X79 SATA 6Gb/s USB 3.0 ATX Intel Motherboard
- 8 x DIMM, max up to 64GB, quad-channel DDR3 1866/1600/1333/1066 Support
- 2 x PCIe 3.0 x16 slots (@ dual x16/x16) with NVIDIA Quad-GPU SLI and Quad-GPU CrossFireX...
- Thermal Armor Technology - Improves air flow with an innovative vent design and integrated...
- TUF Capacitors, Chokes and MOSFETS - Certified by military standard to ensure ultimate...
3.Graphics Card
When it comes to video cards, you have a diversity of options greater than any other components in a system build. But at the end of the day, it all comes down to what YOU want to use the computer for. This is the section where you will make the final decision. It rather depends on what you want this system to be than following my advice too closely and pay for something you never need. I will list both options on Radeon and NVIDIA-equivalent product so you have the opportunity to stick with either one you are comfortable with. You can also use the Graphics Cards Comparison Tool for better understanding of each video card performance.
Entry-level gaming : ~$100 range
 GIGABYTE ATI Radeon HD6850 1GB DDR5 2DVI/HDMI/DisplayPort PCI-Express Video Card GV-R685OC-1GD
- Support ATI Avivo HD Technology Support HDCP - High-bandwidth Digital Content Protection...
- Support Microsoft Windows 7/Vista Support ATI CrossFireX Technology Support ATI Eyefinity...
- Memory Interface: 256-bit Bus: PCI-Express 2.1 x16 RAMDAC: 400 MHz Stream Processor: 960
- Chipset: Radeon HD6850 Engine Clock: 820 MHz Video Memory: 1GB DDR5 Memory Clock: 4200 MHz
 Gigabyte GV-R775OC-1GI AMD Radeon HD 7750 1GB GDDR5 DVI-I / D-SUB / HDMI PCI-Express 3.0 Graphic Card
- Gigabyte Ultra Durable 2 Components - Ultra Cooling Low RDS(on) MOSFET Design - Low Power...
- Gigabyte Custom-Designed 100mm Fansink for maximum cooling efficiency and whisper silent...
- Core Clock: 880MHz - Memory Clock: 5000MHz
- Features DVI-I/D-SUB/HDMI outputs with HDCP protection.
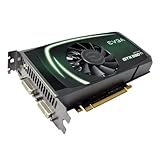 EVGA GeForce GTX 550 Ti FPB 1024 MB GDDR5 PCI Express 2.0 2DVI/Mini-HDMI SLI Ready Graphics Card, 01G-P3-1556-KR
- GeForce GTX 550 Ti with 951 MHz core clock
- Interface: PCI-E 2.0 16x, DVI-I, DVI-I, Mini-HDMI and SLI Capable
- 1024 MB 192-bit 0.5ns GDDR5 memory
- 4356 MHz Effective Memory Clock and 1903 MHz Shader Clock
Either one of these two starter video cards will give you a very decent 3D rendering power on any taxing games. However due to the limited amount of core processors, you may find yourself hope for a little more performance on graphics intense works; such as dual monitor setup for graphics design, movie editing or gaming.
Mid-range level gaming ~$200 range
 GIGABYTE ATI Radeon HD6870 1GB DDR5 2DVI/HDMI/2x Mini DisplayPort PCI-Express Video Card GV-R687OC-1GD
- Support Avivo HD Technology Support HDCP - High-bandwidth Digital Content Protection...
- Thermal: Fansink (3x Cooling fan) Support Microsoft Windows 7/Vista Support ATI CrossFireX...
- Memory Clock: 4200 MHz Memory Interface: 256-bit Bus: PCI-Express 2.1 x16 RAMDAC: 400 MHz
- Chipset: Radeon HD6870 Engine Clock: 915 MHz Video Memory: 1GB DDR5
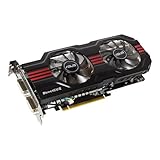 ASUS ENGTX560 TI DCII TOP/2DI/1GD5 GeForce GTX 560 Ti
- Top-selected and overclocked to 900MHz, 80MHz higher than reference for faster and...
- Speed up heat dissipation with doubled airflow via exclusive DirectCU dual fan design
- Pump up graphics performance with Super Alloy Power delivering a 15% performance boost,...
- Crank up 50% faster clock speeds with exclusive Voltage Tweak
These are the best bang for the bucks video cards on the market as of mid-2012. They balance well between the cost per performance while deliver outstanding horse-power. Unlike the lower bracket, these mid-range cards are less likely to have stuttering frame-rates on heavy 3D screen. They also do well on two monitor setup, but some frame-lags are inevitable. However, it is not very easily noticeable thanks to the other fast components in this system build.
High-end gaming ~$300 range
 Sapphire Radeon HD 6950 2 GB DDR5 DL-DVI-I/SL-DVI-D/HDMI/DP PCI-Express Graphics Card 100312-3L
- 1xDisplayPort
- 1xDual-Link DVI-I
- 1xSingle-Link DVI-D1xDisplayPort
- 1xHDMI 1.4a
 ASUS HD7870-DC2-2GD5 Radeon 2GB DDR5 VGA/DVI/HDMI/DisplayPort GPU Tweak Utilities PCI-Express 3.0 Graphics Card HD7870-DC2-2GD5
- ASUS Exclusive DirectCU Thermal Solution: The flattened copper heat-pipe contact GPU...
- GPU Tweak utility allows you to tune graphics card performance and check card status via...
- AMD Eyefinity technology extends the View across multiple monitors to immerse yourself in...
- New PCI Express 3.0 delivers improved encoding and twice the performance of PCI Express...
 EVGA GeForce GTX 570 HD Double Shot 1280 MB GDDR5 PCB PCI-E 2.0 Graphics Card 012-P3-1577-KR
- 43.9 GT/s Texture Fill Rate
- 3800 MHz Effective Memory Clock and 1464 MHz Shader Clock
- 1280 MB 320-bit 0.4ns GDDR5 Memory
- PCI Express 2.0
You are looking at the power gamers would love to have in their computer. These video cards toy with any games you could possibly challenge them. Since games are no match for these babies, you may have to look at them with a different approach. With the provided power, you would use these high-end graphics cards for top quality video production or graphics design projects. Keep in mind that NVIDIA video cards can only run up to two monitors while mid-range and high-end Radeon can draw at maximum of six monitors simultaneously.
Ultra-level gaming
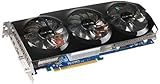
 Gigabyte AMD Radeon HD 7950 3GB GDDR5 DVI-I/HDMI/2x Mini-Displayport PCI-Express Graphic Card GV-R795WF3-3GD
- Ultra Durable VGA materials: GPU Temperature 5%-10% down - Overclocking capability 10%-30%...
- Windforce 3X Anti-Turbulence Cooling with "Triangle Cool" Technology for maximum cooling...
- Core Clock: 900MHz - Memory Clock: 5000MHz
- Features DVI-I/HDMI/2x mini-Displayport outputs with HDCP protection.
 Gigabyte AMD Radeon HD 7970 OC 3GB GDDR5 DVI-I/HDMI/2x Mini-Displayport PCI-E 3.0 Graphics Card GV-R797OC-3GD
- Ultra Durable VGA materials - GPU Temperature 5%-10% down - Overclocking Capability...
- WINDFORCE 3X with "Triangle Cool" Technology for the absolute best cooling performance at...
- Factory Overclocked Edition: Core Clock: 1000MHz (Std 925MHz)
- Supports PCI-Express 3.0 Interface; Supports AMD CrossFire, Avivo HD, Eyefinity 2.0, and...
 EVGA GeForce GTX 580 Superclocked 1536 MB GDDR5 PCI Express 2.0 2DVI/Mini-HDMI SLI Ready Limited Graphics Card, 015-P3-1582-AR
- NVIDIA 2-way, 3-way and 4-way SLI ready
- 4050 MHz memory clock and 1594 MHz shader clock
- PCI Express 2.0
- GEForce GTX 580 Superclocked with 797 MHz core clock
 GIGABYTE GV-N670OC-2GD GeForce GTX 670 Windforce OC 2048MB GDDR5 256-bit PCI Express 3.0 x16 HDCP Ready SLI Support Graphics Card
- Powered by nVidia GeForce GTX 670 GPU
- Integrated with the first 2048MB GDDR5 memory and 256-bit memory interface
- Features Dual link DVI-I/ DVI-D/ HDMI/ DisplayPort with HDCP protection
- Base clock - 980 MHz; boost clock - 1058 MHz
In short :
Now short story long, the only sole reason you should get one of these is to redeem the long lost bragging rights ever since the last time you caught a shiny pokemon, successfully modded your honda civic or date that hot one. But jokes aside, you get the best performance of both NIVIDIA and Radeon have to offer.
There are overclockers out there who put more than a couple of these into their system and run six monitors at 5760 x 2160. It is overkill, yes. And looking on the practical side, HD movie editing and extreme resolution graphics design get the speedy advantage from the high counts of Stream ( Radeon) or CUDA (NVIDIA) processors on board.
4.Memory
Since the motherboard runs best with four memory sticks, you have to decide whether it should be 16GB or 32GB for your rig. It’s common to start with four 4GB modules but not an exception to jump straight to 32GB ( four 8GB modules). For an ultra high gaming session along with some short-length movie editing or high-res image editing you are safe with 16GB, but if you are looking to run multi ultra-high game windows, plus serious movie clip editing or super high definition photo design all *simultaneously* you should by default, go with 32GB. You may also want to require the higher capacity if you run virtualization (VMware) or any resource-intense environment.
Note that Windows 7 Home Premium does not support more than 16GB of memory, thus you need to upgrade to Professional edition to recognize up to 192GB RAM.
 Corsair CMZ16GX3M4A1600C9B Vengeance Blue 16 GB DDR3 SDRAM Dual Channel Memory Kit 1.5V
- 16GB (4x4GB) DDR3 for AMD, Intel Dual processors and upcoming 2nd Generation Intel Core...
- 1600MHz
- 9-9-9-24 latency
- Vengeance Blue heat spreader for styling and performance. A perfect match for Intel Sandy...
 32GB G.Skill DDR3 PC3-12800 RipjawsZ Series for Intel X79 (10-10-10-30) Quad Channel kit 4x8GB
- 32GB G.Skill RipjawsZ Series
- Quad channel kit 4x8GB
- DDR3 1600MHz
- PC3-12800
5.Storage
 Storage for a gaming and work PC also has a lot to be concerned. A mechanical drive is definitely needed for the amount of data being generated, either it is databases, or photos from graphics editing works or HD movie project files. However, modern computers have to deal with too much unnecessary wait time due to the bottle neck at conventional drive level.
Therefore, I do recommend to have a Solid State Drive installed into this custom Workstation / Gaming to improve system responsiveness. Solid State Drive has excellent seek time (< 0.1ms) and speedy data transfer rate (up to 500mbps for both read and write) which way superb over the spinning disk (seek time is above 4ms with an average transfer rate of 50~130mb/s for both read and write speeds).
Again, the ideal setup would be having the SSD as the main drive for Operating System and programs while leaving the secondary mechanical drive to take care of your personal data files. The reason is to avoid spend too much for a high capacity SSD, which still costs a very handsome amount of money nowadays.
You do not need anything bigger than 120GB of space, or in some case a 60GB SSD is more than sufficient under many circumstances. Anyhow, the final decision is in your hand :)
Don’t know which one to go with ? Check out Round-up of The Best and Fastest Mainstream Solid State Drives from 7 Reputable Brands !
If you happens to stick with a SSD, be sure you’ve known by heart the 3 Easy Steps to Optimize Solid State Drive before the OS installation.
 SAMSUNG 830 Series 2.5-Inch 64GB SATA III MLC Internal Solid State Drive (SSD) MZ-7PC064B/WW
- Enables you to boot up your computer in as little as 15 seconds
- Energy efficient - improve your battery life by up to 30 minutes
- Outstanding Multitasking Performance - It's the ideal solution for your everyday computing...
- Superior random read speeds - up to 80,000 IOPS
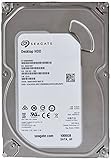 (Old Model) Seagate 1TB Desktop HDD Sata 6Gb/s 64MB Cache 3.5-Inch Internal Bare Drive (ST1000DM003)
- Ideal for everyday desktop and computing storage
- 1TB capacity stores 120 HD video, or 200,000 photos, or 250,000 songs
- 7200 RPM
- Store data faster with SATA 6GB/s interface
 WD Blue 1 TB Desktop Hard Drive: 3.5 Inch, 7200 RPM, SATA III, 32 MB Cache - WD10EALX
- Ships in Certified Frustration-Free Packaging
- 1 TB capacity holds up to 200,000 digital photos, 250,000 MP3 files, and 120 hours of HD...
- 3rd generation SATA interface for 6 GB/s maximum data transfer rates.
- WD Caviar Blue hard drives have a multitude of features to deliver rock solid performance...
6.Power Supply
For a peace of mind and good protection on your internal hardware, we ought to look for a reliable power supply. Every year around summer time especially during stormy day, you will find at least one or two person having problem with a fried or dead computer because of power surge. Perhaps you do not want to be part of that group, and we have to prepare as much as possible to avoid such condition when it happens.
This power supply should also have sufficient energy to run the whole machine on constant high-load without any hiccup. With this requirement, we know that the power supply will not random restart the computer when you throwing heavy processes at it. Another important demand is a good amount of ampere (amp) on the 12V rails, which signals that it can deliver the cleanest current to the video card.
Now with all that considered, The Corsair Enthusiast TX750M is one of the best choices for what we need. It meets the all the strict criteria above plus it is also a modular power supply. You will have a tidier internal space and smoother ventilation just by doing some simple wiring management.
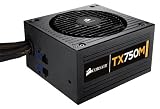 Corsair Enthusiast Series TX 750 Watt ATX/EPS Modular 80 PLUS Bronze (TX750M)
- 80PLUS Bronze certified, delivering up to 85% energy efficiency at real world load...
- A dedicated single +12V rail offers maximum compatibility with the latest components.
- An ultra-quiet double ball-bearing fan delivers excellent airflow at an exceptionally low...
- Over-voltage and over-current protection,
 PC Power & Cooling 750W Silencer MK II High Performance 80PLUS Silver SLI CrossFire Intel Haswell Ready Power Supply- PPCMK2S750
- 750W Power Supply
- ATX12V v2.2 and EPS12V, Main connector: 20+ 4-pin ATX
- 135mm ball-bearing fan, SLI and Crossfire Ready
- 80+ Silver Certified, Typical load 88% Efficiency
7.Chassis
It’s acceptable for a work computer chassis to be plain and simple, or a gaming computer case to look bad-ass and bulky. However it is whole lot more difference when we are building a combination of both.
Perhaps it is because the nature of a workstation requires one chassis that must have more convenient and easy accessible features than the norm. It should have more than four hard drive bay internally, an hot-swappable drive bay on the outside for storage purposes. The front should also have at least one or two USB 3.0 and eSATA Ports, possibly along with a built-in fan controller to reduce the noise level when needed. Even though with that many requirements, all fancy look and feel should be stripped to the minimal to not distract its owner while solving first world problems.
 Now on the flip side, when the work is done and the game hours arise, the case should not be a heat trap to all the internal hardware. The front panel, side and back have to implement mesh design in order to provide a good directional air-flow throughout the interior space. This means the chassis should have a decent cable management architecture that aids the wiring work. This option is important because you will be able to organize the all power cables to keep the common heat spots cluster-free. Smooth ventilation prolongs the life span of core components, especially the capacitors and VRM on the motherboard, video card and memory.
Now that we have the checklist for a case, you know what it should have and what not. However, let’s also not forget our targeted budget and going to spend a fortune for a case, this chassis must be less than $100.
I’m not sure if you have found one but it did take me a bit of time for research and hands-on experience to pick a case with our many strict demands above. Here you have the Cooler Master 690 Advanced II with USB 3.0 Chassis.

This case has been around for a great period of time and received quite many positive feedback from the power users. It has been redesigned a couple of generations and it just got better and better. I must stress the fact that the model we go with is Cooler Master 690 Advanced II RC-692A-KKN5. This is the latest release at the time of this writing with a lots more improvements since its previous siblings.
The case is built with solid metal and has a very sturdy feel. The front panel is simple, fully-meshed to maximize airflow to the inside of the case. The CM 690 also meets our requirements in term of internal hard drive bay and external hot-swappable bay counts, as well as two USB 3.0 and two USB 2.0 ports on the top side.

The blue light in the front panel can easily be turned off via the top button, is a well-loved bonus. If you own a case that has light before you would have already known how annoying it could be to have a shining light staring at you day and night.
Finally, this model now has excellent cable management design. Each and every of the 4 cut-out holes comes with rubber grommet to hold the wires in place, the power supply is mounted at the bottom of the chassis with fan facing down to draw in cool air from the bottom. You also do not have to worry about placing the case on carpet, thanks to the tall rubber feets that rise the case a good one inch above the floor.

Overall, the interior of CM 690 is roomy enough to accommodate a full-length 12-inch long video card means this case is totally appropriate as a gaming system. The exterior is not bulky, not too fancy that distracts the purpose of a workstation. The last and most important obstacle is the cost. This chassis falls right into our budget which runs for about $90 ! It is simply the winner at this point.
However, do not limit yourself to my pick here. You could also use the NZXT H2 case as featured in the Top 6 Most Silent Computer Cases for Quiet Computing, it is a very nice chassis that holds up all the needs that we care about.
Recommended Reading : 12 Best Gaming Cases with Clear Transparent Window for Your Custom PC
8.The Rest
Similar to other computer builds, the last component but sometimes draws a fine line between a fully working computer and a useless one is the optical drive. Without this device you may find yourself questioning how the hell am I going to install operating system on it.

For those of us who wants a better cooling for their processor or simply want to push the stock speed further, you may want to pick one of the self-contained 8 Best Prefilled Liquid Cooling Kits for Your Processor. Installation should be a breeze since there is no partial assembly required.
You may also need a wireless adapter or a media card readers for the system, thus I include some of the great options that my clients usually pick (be aware of your budget, don’t break it!) :
 Vantec UGT-CR905 58-in-1 Internal Card Reader/Writer with Built-in USB Port for 3.5-Inch or 5.25-Inch Drive Bay (Black)
- Read/Write to 58 Types of Memory Cards
- Simultaneously Transfer Data between Memory Cards
- Fits in Any Standard 3.5-inch or 5.25-inch Drive Bay
- Built-In USB 2.0 Port
This is a pretty darn long article and I’m very glad you stick til the very end of it. I bet you have had your configuration somewhat planned out already, and if you happen to actually make one — be sure to share it with me at Custom PC Guide dot net!
Wish you the very best luck and thank you for visiting today :D !

So you ask what this hardcore computer is for?