 If you are hosting your website using Cloudways or ServerPilot, you probably realize they do not have a free built-in email server to use with your domain. What that means is you will not be able to send and receive emails via [email protected].
Though you’d get better performance with Cloud VPS, you have limited options when it comes to a mailbox using your own domain. A full blown email server is not free and definitely not easy to set up.
 Now Cloudways and ServerPilot both offer free SMTP service that essentially allows you to integrate Gmail account to the application via SMTP authentication –but you can only use whatever email address you already have at Gmail; if that’s the case then I either have to make a new gmail account or the contact page of Custom PC Guide.net would look something like this –“Hi guest, if you have any questions please send a message to [email protected]“.
Yeah… NO. I definitely prefer something like [email protected] instead.
In this case, my option with Cloudways would be using Rackspace email service which costs me $1 for each email address every month. Or per ServerPilot –as outlined here in ServerPilot’s community— provides several options which varies from email forwarding services to $4/mo FastMail.fm service or $20/mo Cpanel add-on server.
So the good news after this article, you don’t need to pay to get an email address of [email protected]. The great news is you can both send and receive emails via that address. The best news is it will be integrated into your existing Gmail or Hotmail account seamlessly. The blessed news is you can create as many addresses as you want and it’s still free. The bad news is, it’s going to be a long read.
This is how it works:
Mailgun offers a Free plan for email routing. Technically, Mailgun acts as a secured post office for your mailbox. If someone sends an email to [email protected], that email will be redirected to my Gmail account. Very simple.
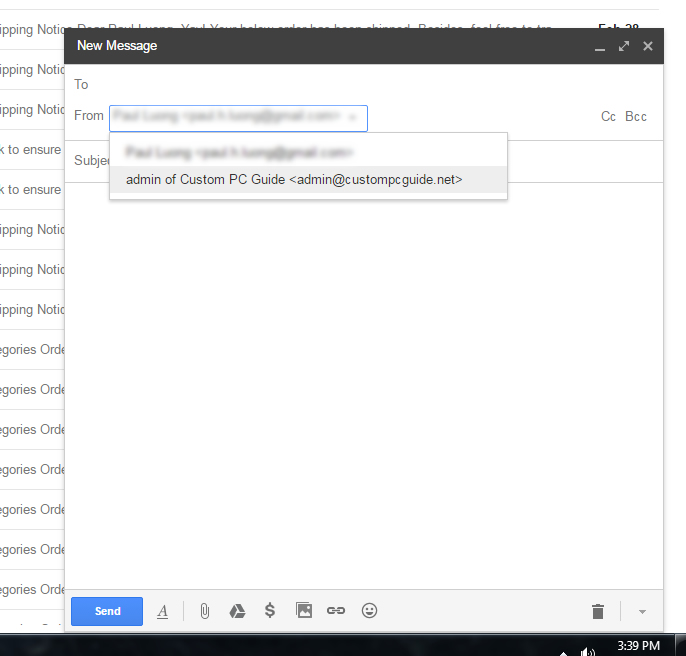
How about sending email? Yes, I can definitely send emails right from my Gmail account under the address [email protected]. You can choose this option later in the Compose window.
My customers/readers will never know that I’m actually using Gmail to manage the messages that they send to [email protected].
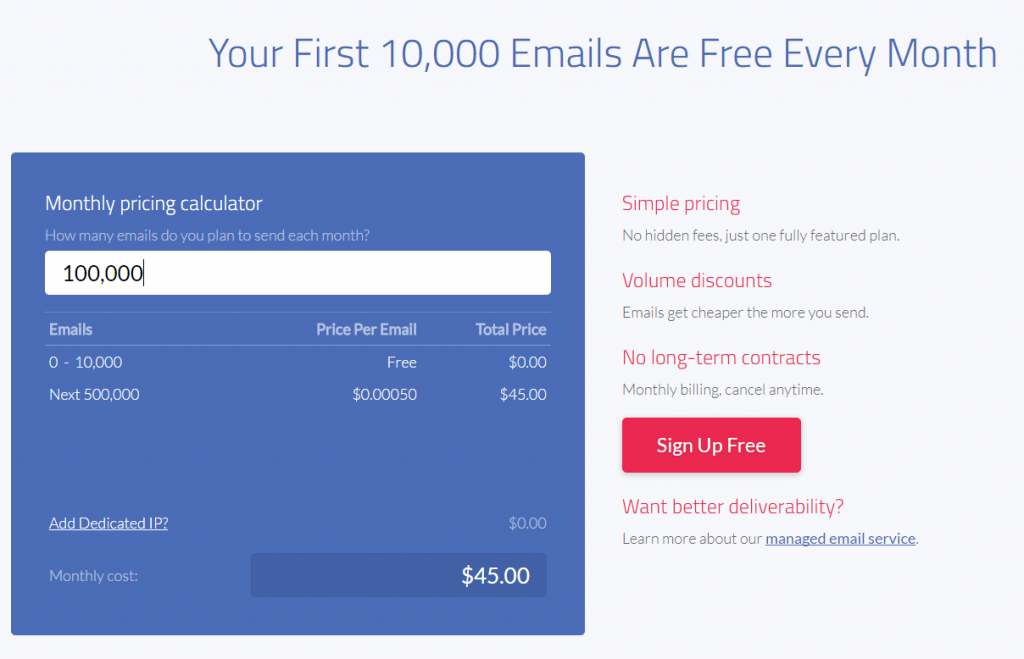
Now the catch for this free plan is you are limited to 10,000 email sent per month. Cheesus if you really send that many emails per month, I’m sure you can afford to pay an extra $0.00050 per additional email sent within that period. Another bad news is you must have a credit card on file to send emails to everyone. The reason behind this is Mailgun has to enforce some way to discourage malicious bots from abusing the system for spams.
You can still send emails without a credit card on file, but the recipients must be on the Mailgun’s whitelist a.k.a Authorized Recipients. Now having a payment method saved does not mean it’s going to cost you anything, it will be free until you reach 10,001 emails sent.
Alright, if this what you want to do then let’s get started. First, these are the requirements :
- You must be able to change DNS records of your domain. I’ll be using Cloudflare DNS editor in this guide. Your interface may look different but it will essentially be the same. I recommend parking your domain with Google Domain (free domain privacy) if you don’t use Cloudflare.
- You need to create a throw-away email account or just use a different email account (B) other than the main gmail/hotmail account (A) for verification and confirmation.
Now looking at these requirements, I’m sure the lightbulb just went all halo in your brain. That’s right, we don’t even need a host at all; meaning if you buy a domain for $2.99 from GoDaddy, it’s everything you need to have custom email addresses from your personal domain now.
I – Sign Up and Set up a Mailgun account
- Head over to Mailgun and register yourself an account. You don’t have to type in credit card information right now. Remember to using the secondary email (B) for registration. Mailgun may send you an email to that address for confirmation and a text to your phone number for verification.
-
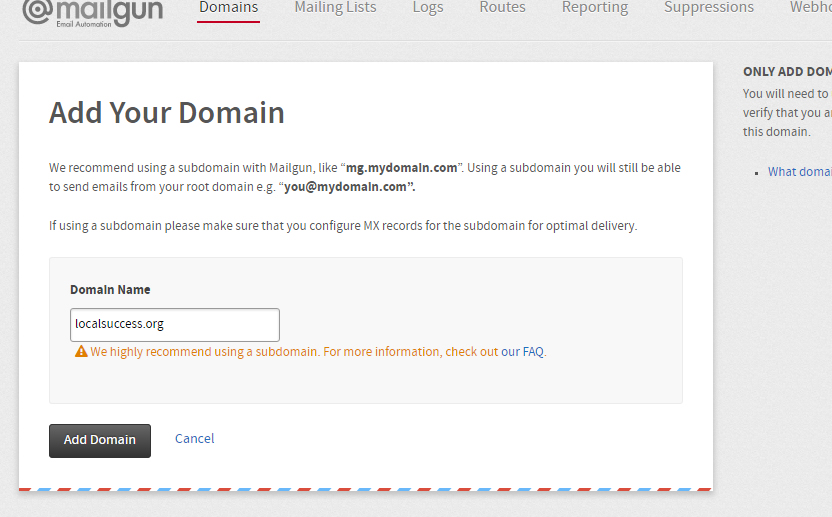
When all said and done, time to Add Your Domain.
Mailgun advises using a subdomain to avoid messing up your root domain’s MX records. But if you are on Cloudways/ServerPilot or on your own at DO/Vultr/Linode, you probably don’t have an email server to point those MX records to anyway. Plus, using a subdomain here will potentially create more problems for you in the future hence go ahead and put your root domain in the box.
In this example, I’ll be using Local Success.org for demonstration.
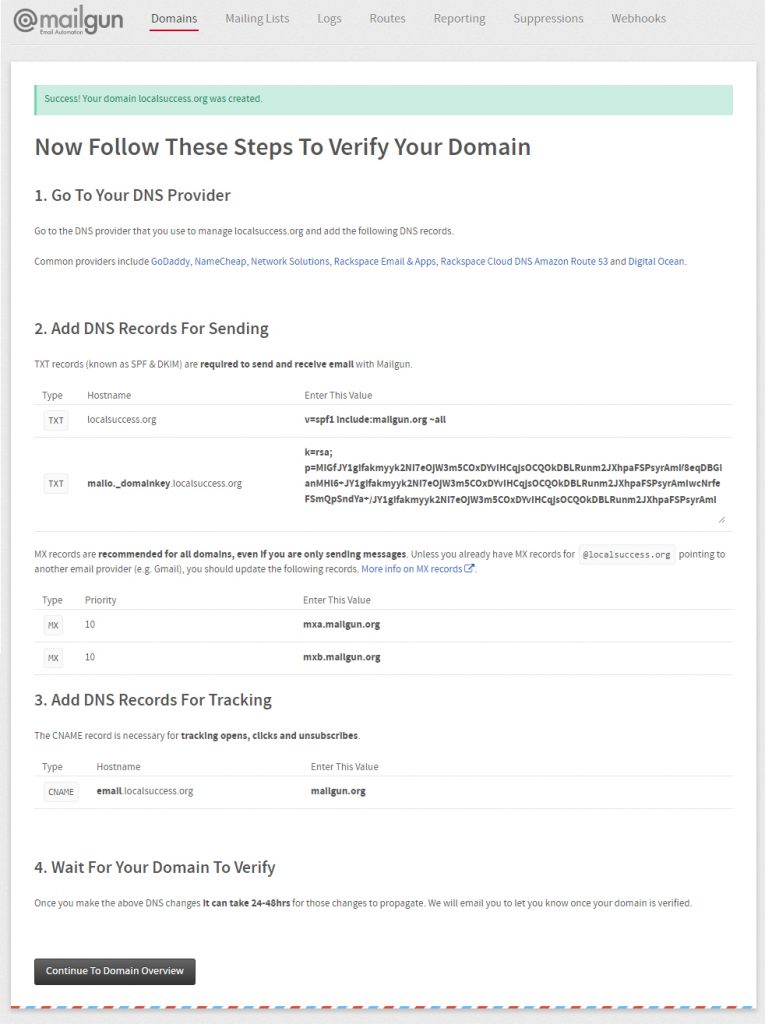
- What you’re seeing here is the complete information that must be set up in your domain’s DNS records.
Logon to your domain panel and look for the DNS editor. If you have Cpanel it is known as Advanced Zone Editor. If you are using Cpanel, I wonder why you need to do this anyway since Cpanel provides a built-in email server already. Perhaps, you are transferring website to its new home.
Since I have appointed my nameservers to Cloudflare’s, I will be using Cloudflare DNS editor instead. As I have mentioned, the interface looks a bit different but it is essentially the same process. There are two records that requires your attention:
You will be replacing the two record above with mailgun’s value. Be sure to create a local backup to notepad before you make any changes.

You then need to add 3 more records including a CNAME, a TXT and one more MX.

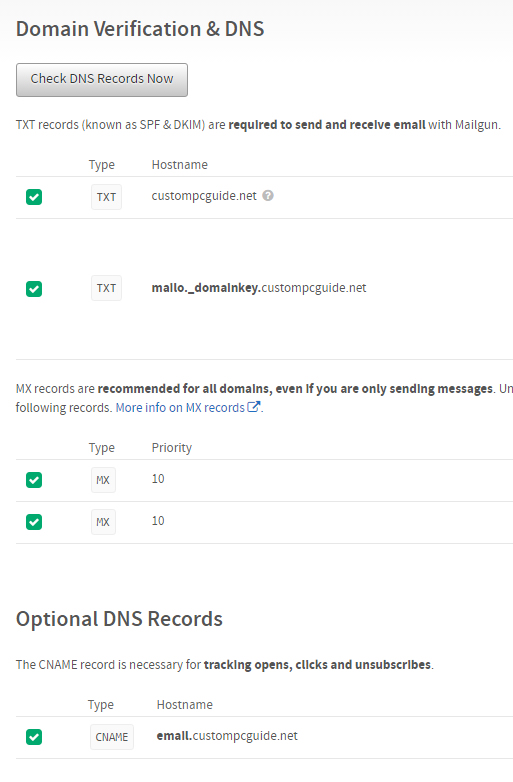
- Once that’s done. Click Continue to Domain Overview. One the next page, scroll down and click Check DNS Record Now.
If everything checks out, you are ready to create a route for an email of your choice at your domain now. Here I have a screenshot of successful Custom PC Guide’s records.
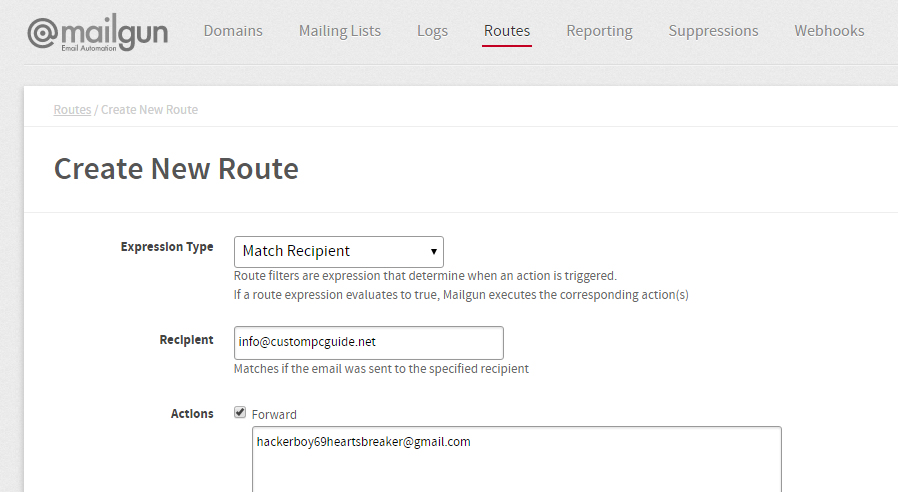
- Create a new route. On this page, there are 3 main infos you need to fill out.
First, choose Match Recipient for Expression Type. This means Mailgun will catch any email that sends to the matching email address declared in Recipient, then redirect it to the final destination provided in Action -> Forward input. That would be your Gmail or Hotmail address.
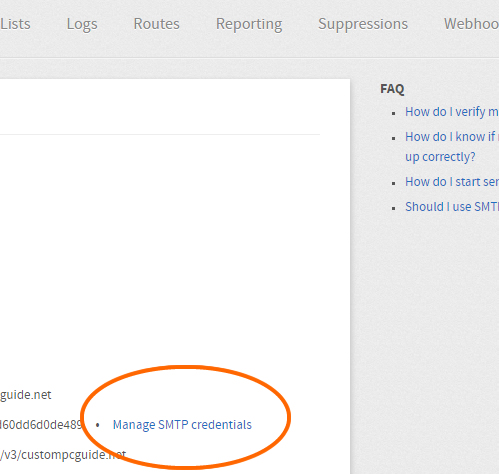
- The last step here is creating a SMTP credential in order to allow Gmail / Hotmail server to send email under your new email address. If you don’t want to, you can skip this step and jump to section II.
Otherwise go to Domains, then click on your domain. Continue to Manage SMTP credentials » New SMTP Credential.
Follow through to create your first STMP account. Remember the username and password for later use.
II – Connect Mailgun to Gmail / Hotmail
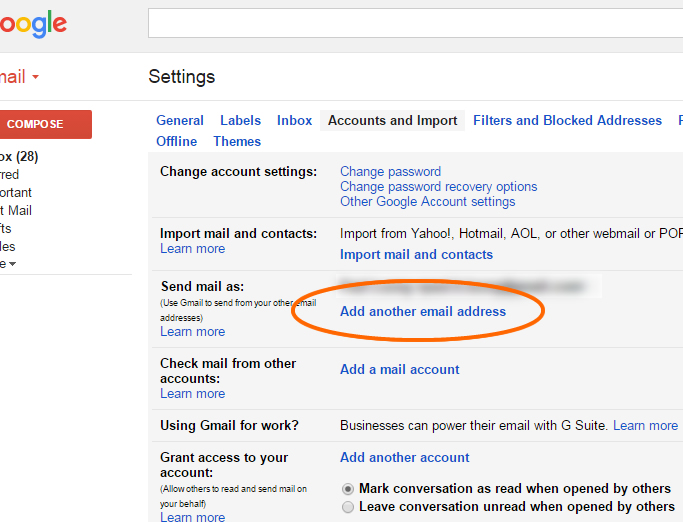
- Go to the Settings > Account and Import section of your Gmail Inbox. Click Add another email address.
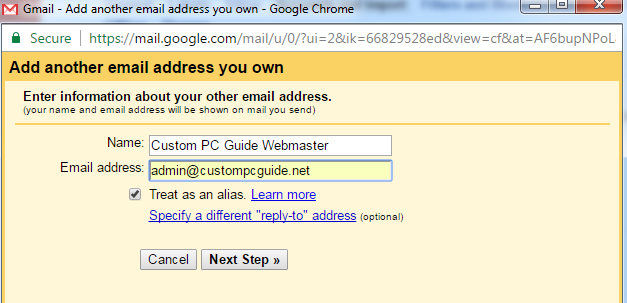
- Fill out these two boxes. The second one is your new email address @yourdomain.com that you declared in section I > step 5 above.
The next window is going to require the SMTP credential you have just created previously.

That’s it! You are all done. Click Compose and choose your new email address under From section, then send a test email to the throw-away account to make sure everything works fine.
- You can do the same thing for Hotmail account via Connected accounts option in your mailbox.
- If you are running WordPress, you now can install WP Mail SMTP plugin to reconfigure the WordPress’s default method of sending emails to secured Mailgun SMTP connection. Otherwise, WordPress would not be able to send emails.
Mailgun has changed their Free Account. It is now “”Try us out! Get 5,000 free emails per month for 3 months, then only pay for what you send”
Still good deal.
Thanks for the tutorial! Got one issue though. The recipients see’s my new email address when I initiate. But they see my old gmail address when I reply. Is there something I’m doing wrong?
When you reply, also make sure you choose the correct “From” address. Gmail typically sets the gmail account as default for reply unless you specify to use the domain email address at all times.
Whaoo, that’s amazing, I just tried it and it works great! I will certainly come in handy, thank you!
Just a note/question though. Would that essentially mean that you use Mailgun as your own personal address? I am just asking because from what I have read, Mailgun doesn’t recommend that.
https://help.mailgun.com/hc/en-us/articles/203306710-Can-I-use-Mailgun-for-my-personal-email-address-
Any thoughts?
If you have a website, it’s more for business purpose.
Thanks for the tutorial…
Managed to get this working but having an issue replying to emails using the new email address I set up in Mailgun. (sender NOT being the Gmail email address) . When replying to an email thats come in to Gmail via Mailgun I can choose a “From” email address and pick the email address I created in Mailgun, but the mail is not being delivered. Any idea how to get this working?
I believe there is a verification process required by Mailgun which they recently implemented to stop spam. Check your mailgun control panel to see if you have to do something to be able to send email to any recipients. Also use their test tool in to make sure your email can actually go through without any problem.
Thanks for this! Great tutorial. But I’ve got one possible issue. I’m using cloudflare as well and all the new DNS entries are green except the CNAME which is still an orange triangle. I’ve be set up with gmail and emails seem to be working. Is this a problem for everything to function properly ? Or may the CNAME still be resolving?
I’m starting to use cloudways and have this site on there but still have my shared hosting which has cPanel and has been handling email.
Is there a possible conflict with my shared hosting still handling mail?
Thanks
Possibly. Some DNS settings must be added per the instruction on Mailgun DNS page, but some may already exist since you were using a shared host. If you are confident, back up all the DNS configurations to a txt file and start fresh.
Many thanks for sharing this guide! I succeeded setting up an email for my domain and send emails from this account. These email also arrive and when I reply I receive them in my gmail inbox.
What doesn’t work however, is receiving emails in gmail and the test with WP mail SMTP plugin. I haven’t setup a SMTP service in cloudways yet. Can that be causing the problem?
All problems solved. I hadn’t updated the Clouways SMTP settings. This guide would be a great addition to this article: https://support.cloudways.com/configure-mailgun-smtp/.
Probably something out of control: hotmail puts the emails sent via my new created domain mail addres in the SPAM box. Do you have any suggestion to prevent this?
Maarten – re the Hotmail spam box thing – did you figure it out? I was reading the documentation and ran across this:
https://documentation.mailgun.com/en/latest/best_practices.html#dns
“While it is not required to use the same domain in the From field of the message as the actual domain sending the message, it is highly recommended. Hotmail is especially finicky about this requirement and has a higher propensity to filter your messages to junk if the two domains do not match.”
It’s not neccessary to setup Cloudways SMTP service for the plugin to work. Just make sure you have all the credentials correct and it should work properly :)
Hi there.
This is a very well written guide. I will see if this works and helps our clients out.
P.S. I am the Community Manager at Cloudways
Hey Ahsan thanks for stopping by. Keep up the good works @ Cloudways too!