Well the last couple of days have really put me under the bus. First off, a really bad, bad spring fever. This year’s weather is like a teenage girl’s mood, one day it’s sunshine in the 80s — the next it’s 40s and pouring. Wait if we’re going to have any snow in the summer. But anyway, the weather makes it really difficult to fix the second problem that I got myself into.
So as the title implies, I have a Toyota Corrola that just broke down at the same time I was sick (bad luck always comes in three).
I was driving and doing all the things guys do while driving, like cursing at the next idiot who can’t drive properly. Then out of the sudden karma stroke. As I gently accelerated to 35 the car stalled itself with no throttle for a mere second and I could have sworn I felt a mini earthquake under the hood before it’s back to normal again. The only difference now is that it’d take two red bull before I could turn the damn steering wheel. Plus it’s 80s out and the AC stopped working.
It turned out the nut that holds the serpentine belt’s tensioner sheared off from the motor. That means the belt is completely loosened without the tensioner in place; and the water pump, the delightful A/C, Power steering and the rest of all the crap that make a modern car modern are simply dead.
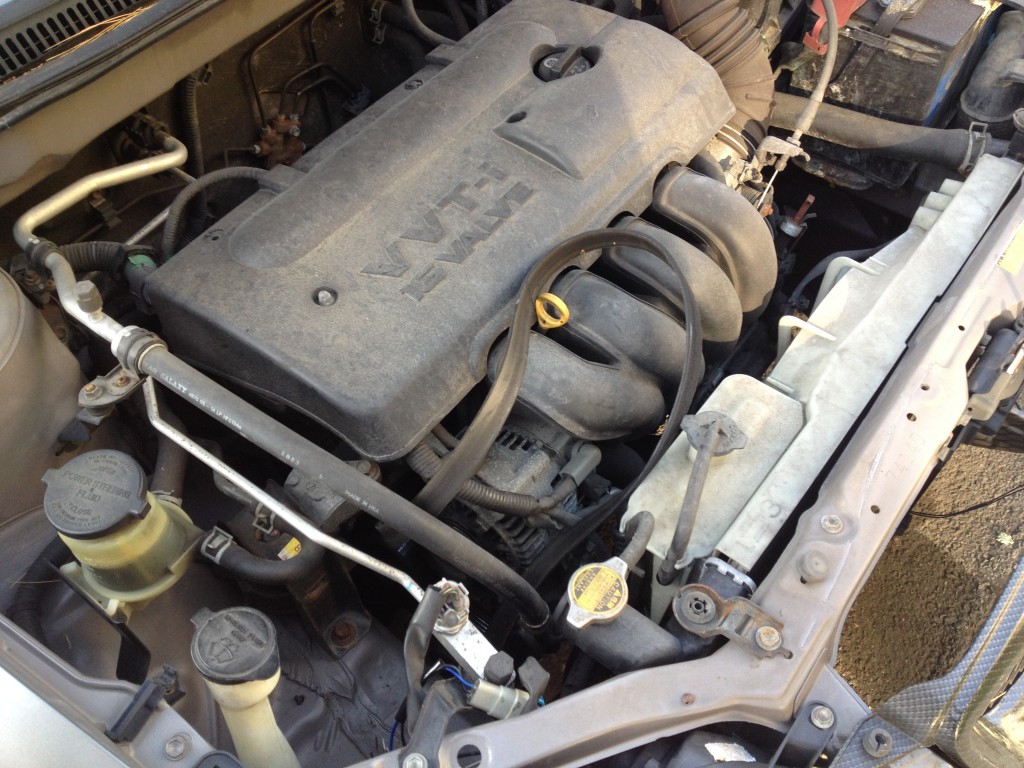
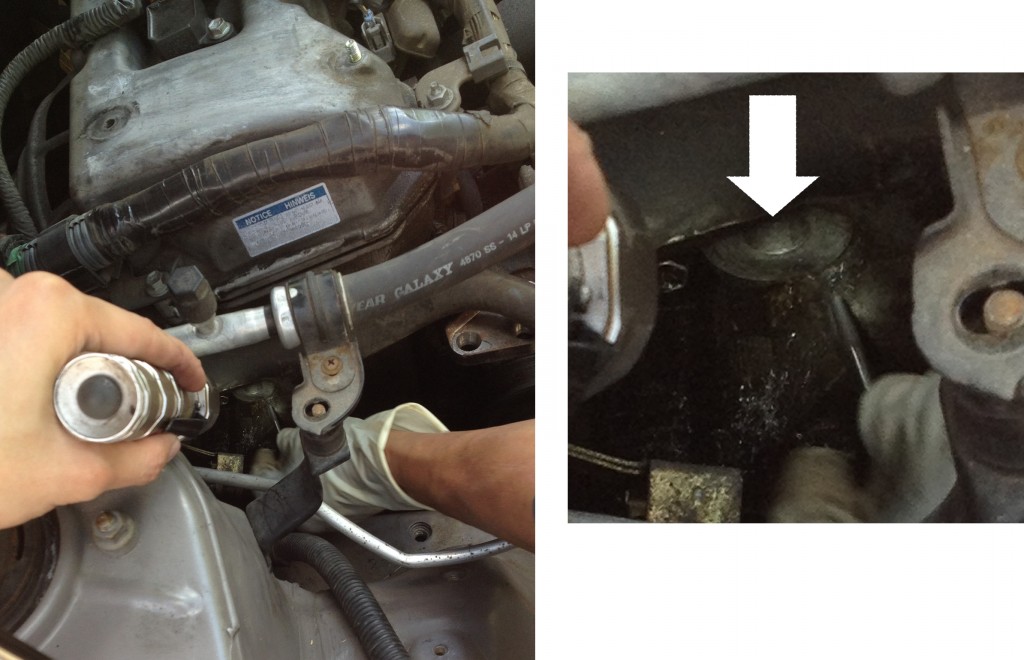
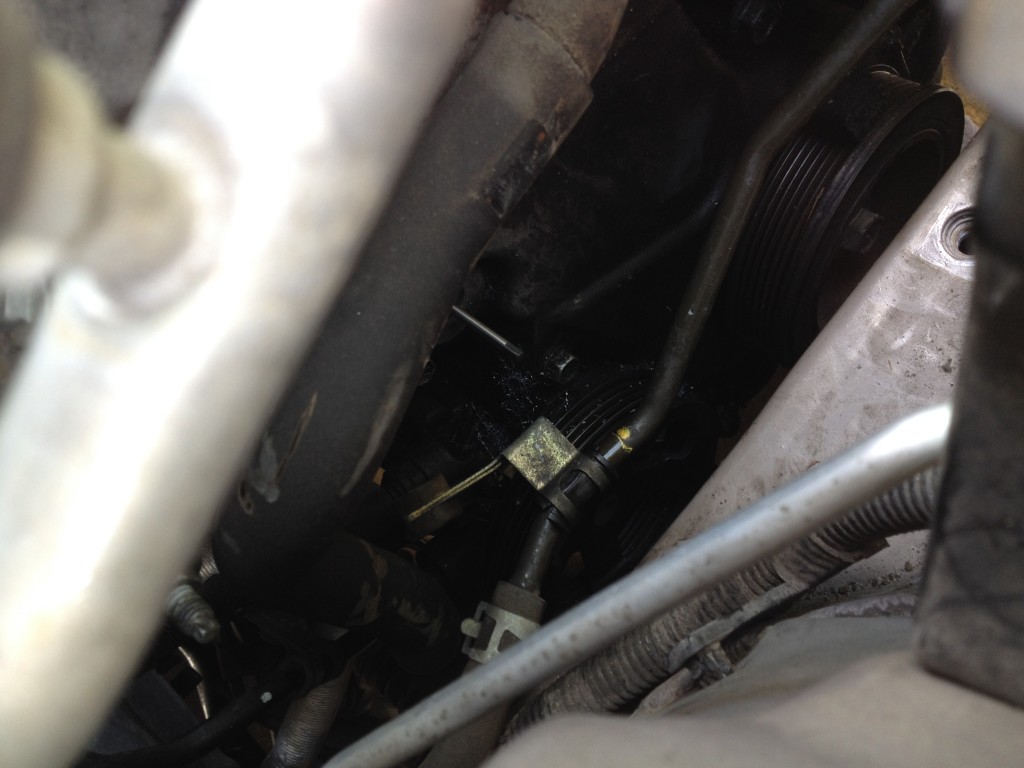
Then the third issue is, this bolt breaks right at the beginning of the thread so a part of it still stuck on the engine block and hidden under a jungle of wires/metal stuffs that I’m so certain that I’d kill myself if I made in contact with any of them. That means there is no way to get it out easily. Look at the picture below and you’ll understand why.
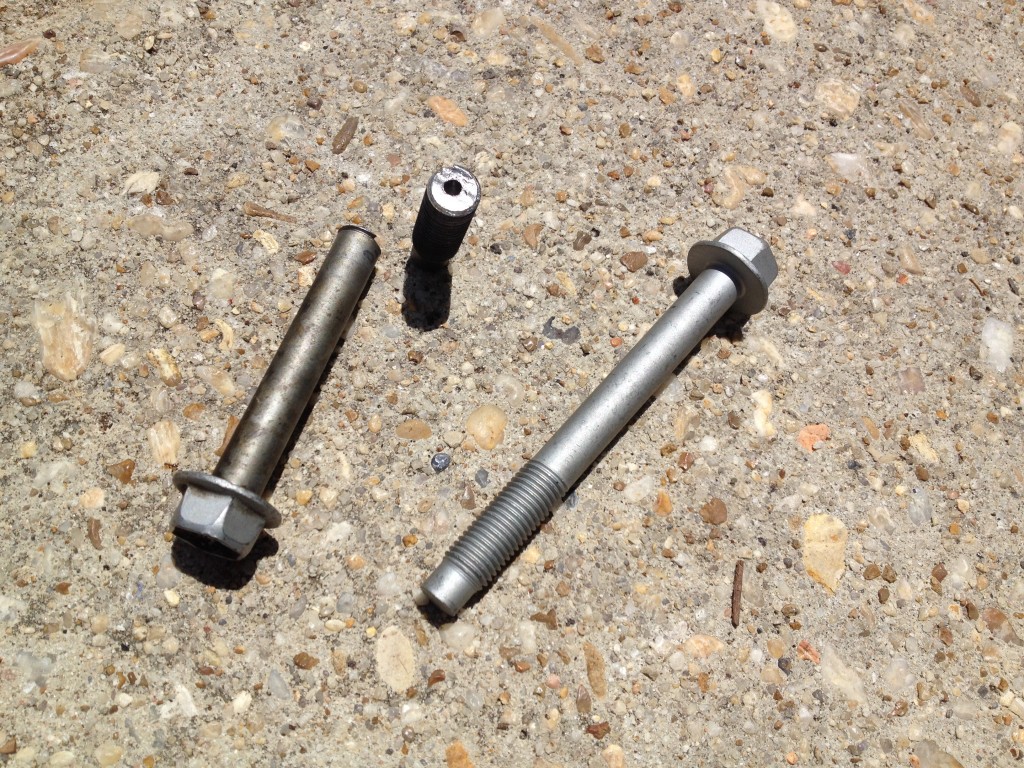
It’s the 17mm bolt (pivot bolt) that goes to the engine block. The 19mm is one you use to adjust the belt.

Now long story short, I brought it to the nearby auto shop. It was a scary ride because there was nothing to cool the radiator (haha those liquid coolers for CPU is nothing!) and the heatwave that day only made life worse. They looked at it, shook head and gave me an estimate of $1200 and a week to fix this problem. I totally expected that price tag because it seemed pretty serious to me, but being a stubborn head I was like heck no. So I drove it home and as soon as the car made it to the parking spot, it’s dead. It was running on the battery the whole time anyway.
Fortunately, I looked up some information online and it turns out a bunch of other people have the same freaking issue (design flaw?). Some says if you could find a mechanic who isn’t afraid of welding the rest of the bolt out it won’t be too hard, the only thing is he’ll have to separate the engine from the body. That means he won’t be able to do it at my home and this car would need a lift. Mooore $ !
So I took advice from this thread and tried it myself (and succeeded!). Here are what you need:
|
on sale
MILWAUKEE'S 2415-20 M12 12-Volt Lithium-Ion Cordless Right Angle Drill, 3/4 In, Bare Tool, Medium
MILWAUKEE'S 48-11-2420 M12 REDLITHIUM 2.0 Compact Battery Pack (1-Pack)
|
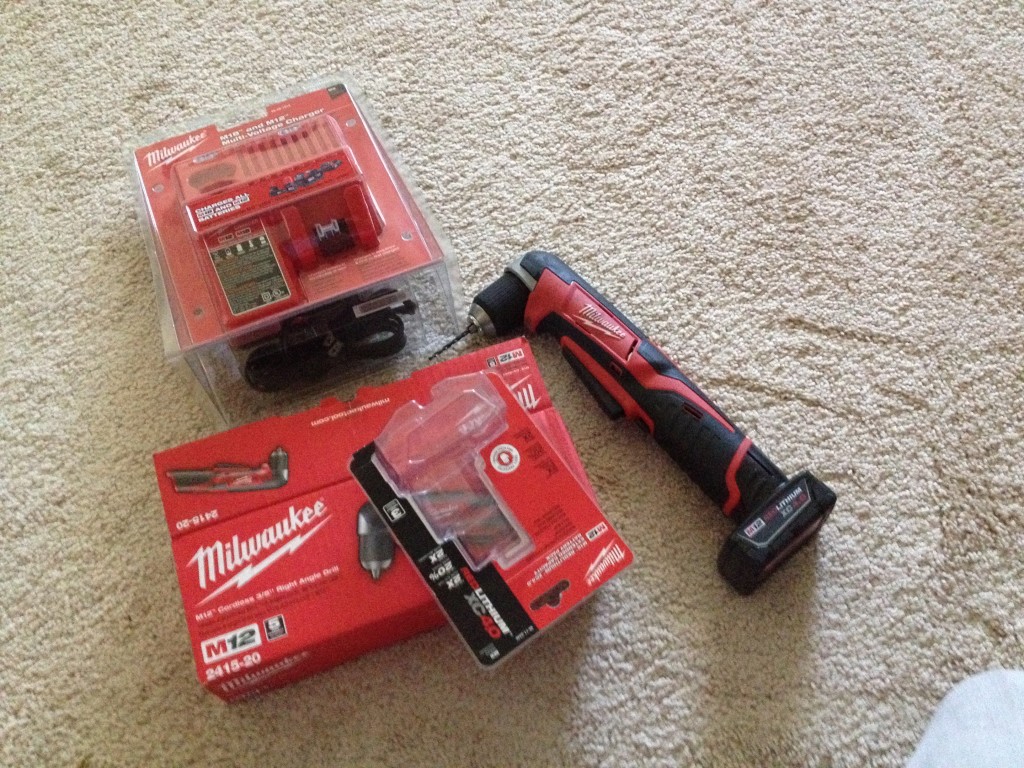
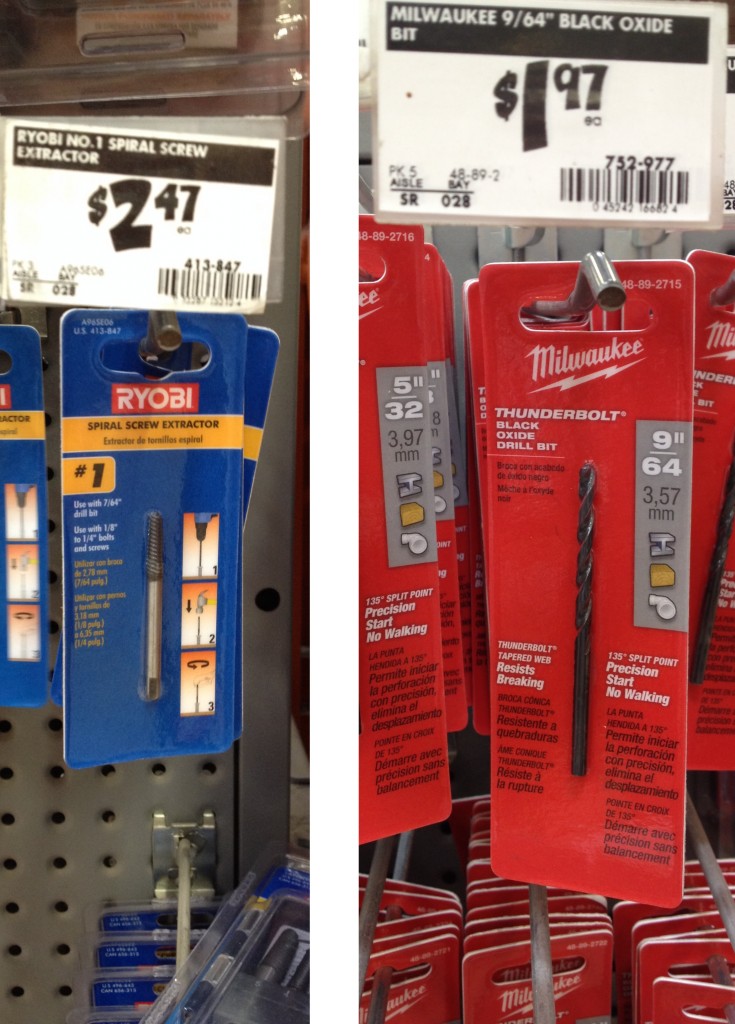
Then you also need this drill bit (1) and a spriral screw extractor (2) from Homedepot. Get the angle drill set (drill+battery+charger) there too if in stock.
Finally, you need a toolkit and a car jack. I hope you already have those laying around. They are pretty essential. If not, you may have to stop by Harbor Freight.

Black Bull FJ2 4000 lbs. Capacity 2 Ton Trolley Floor Jack
on sale

Allied Tools 49029 175 Piece Automotive Tool Set
|
The Works
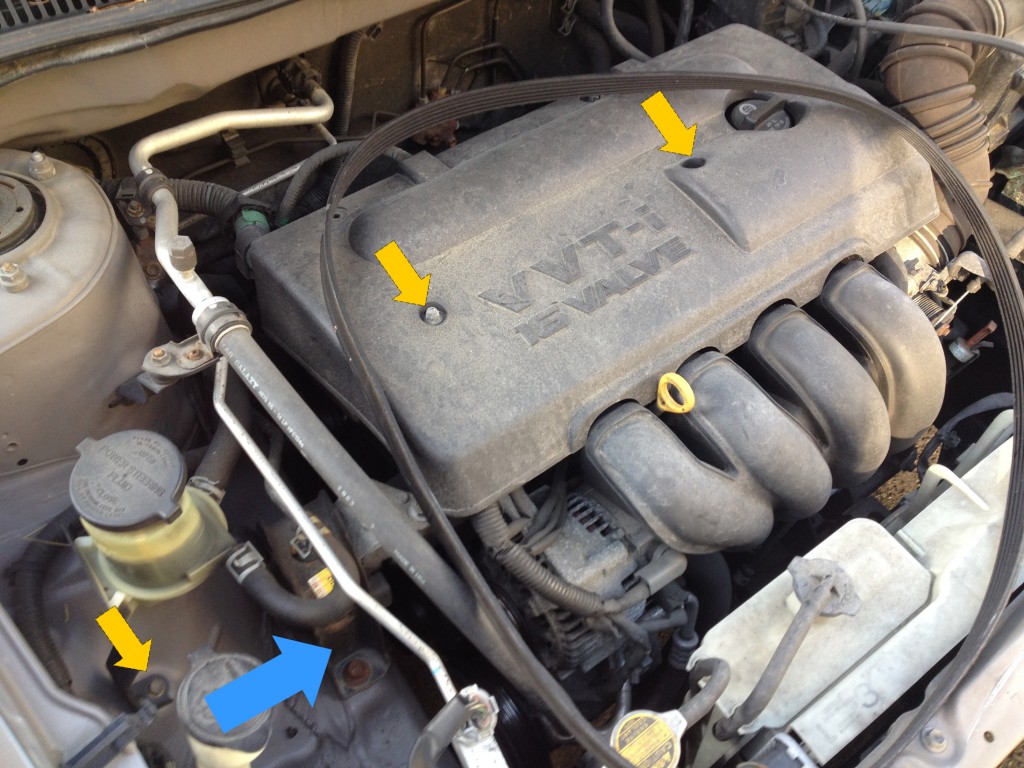
1. Start taking off bolts that hold the marked parts below. Don’t disconnect any fluid holders, you only need to clear the way to raise the motor a little bit and make room for the drilling later. Remove the serpentine belt.
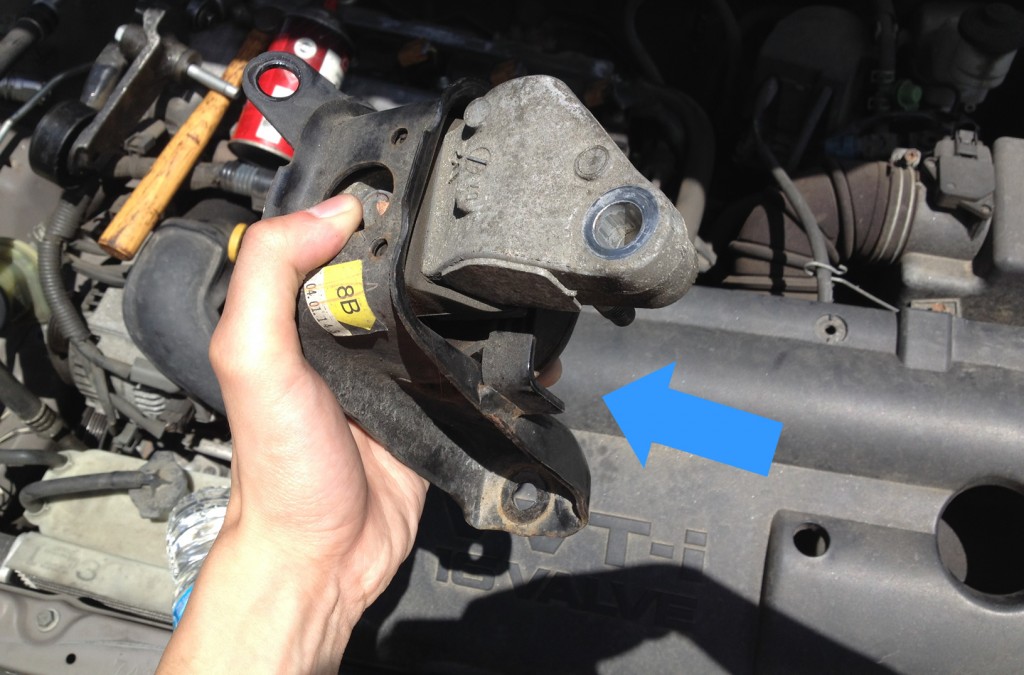
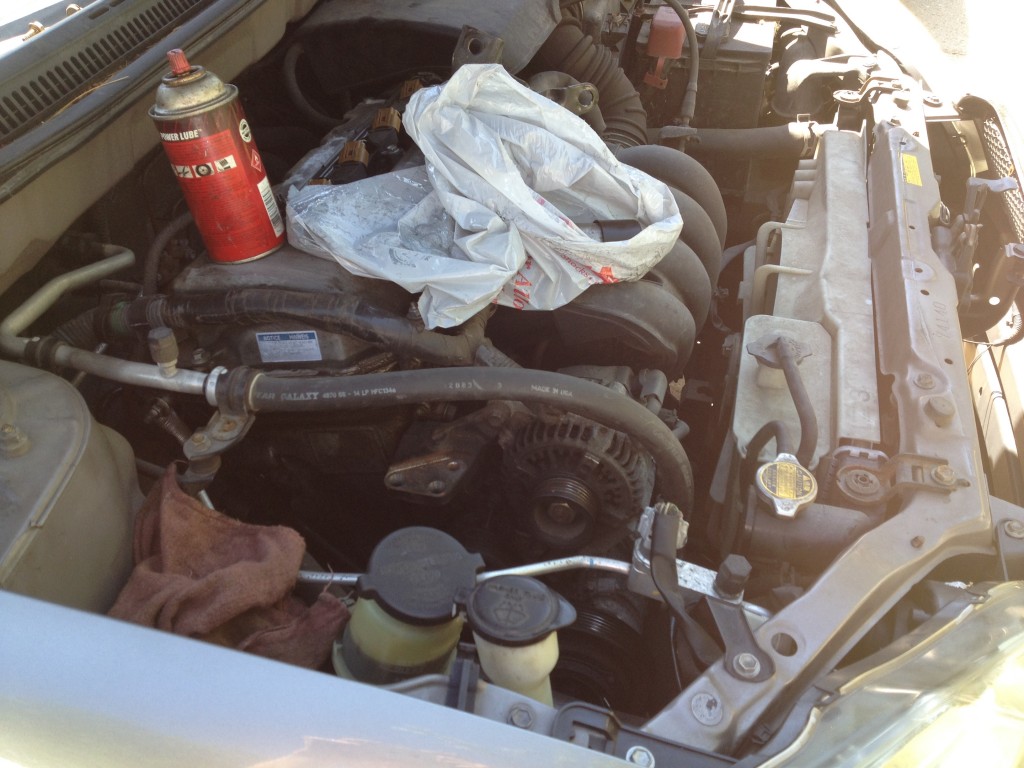
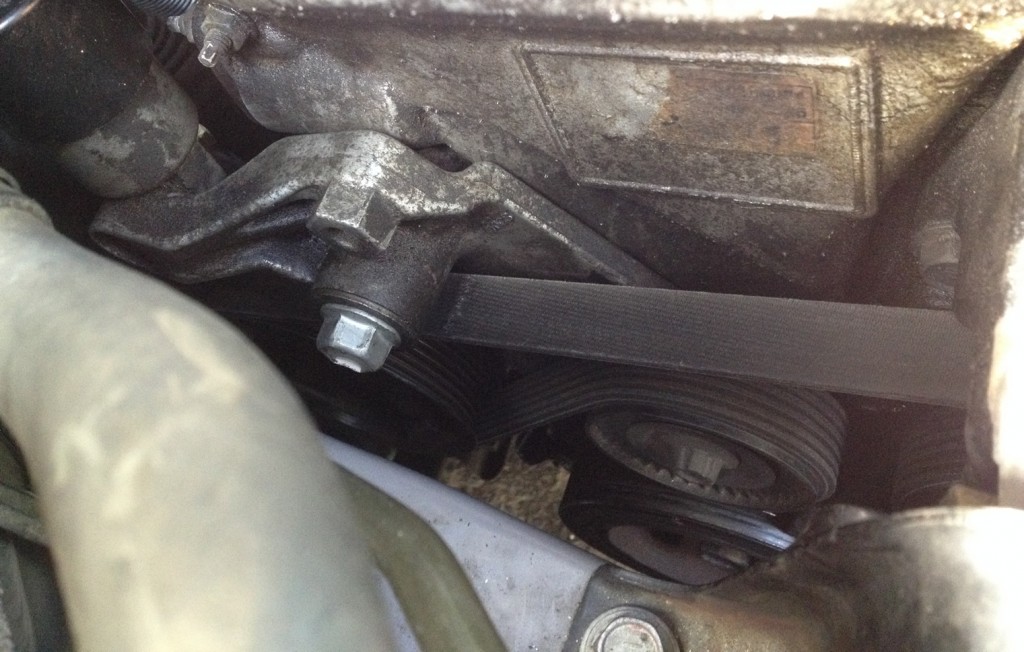
2. Now with the passenger’s side engine mount off, you can raise the motor up a little bit on this side. I put a towel in between to ease the point of contact.

3. Once the engine is raised properly, it should tilt up like this. Then you can start removing the tensioner itself. You should be able to recover the broken bolt, a washer, the tensioner and another nut.
4. Locate the rest of the broken bolt that stuck on the engine block. Set your drill forward and use the aforementioned drill bit (1) to dig a hole into the broken part.
5. When it’s deep enough, go ahead and plug the spriral screw extractor (2) into the hole.
6. The screw extractor now should be able to stay by itself. Use a wrench and slowly turn it counterclockwise to remove the left over part. You may struggle with this a little bit but keep going.
7. Got it out! This sucker is worth $1200 in this case.

8. Bring this bolt to a Toyota Parts store and they should be able to find you a replacement for $10 –Part number 90105-12297 (eBay link).
Here’s a picture of a new one & the old one. Put everything back in reverse order and you just saved yourself $1000 or maybe more.
A new & shiny screw installed!
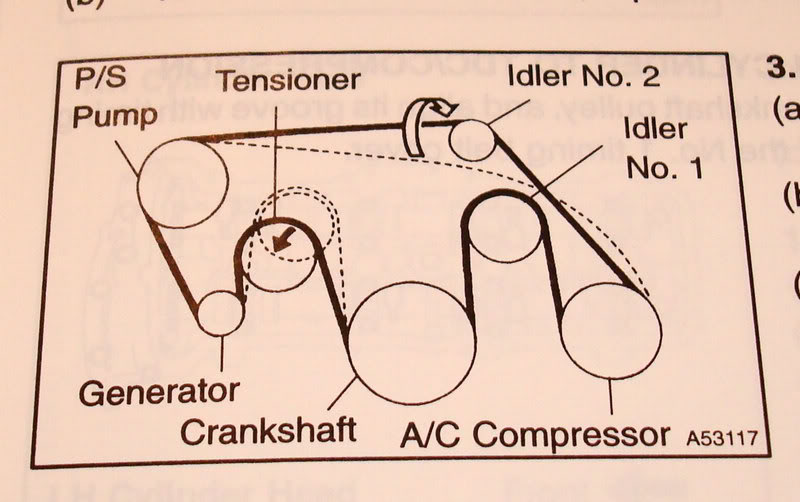
Here’s a diagram of the serpentine belt fyi.
Ready to be back on the road again like her sister (right) :D !

Read another fun review?
 35-Minute DIY Waterless Car Wash & Wax
--...it's now the perfect time to admire your shiny car. Because once you’re driving off the lot, the the greatest apocalyptic shitstorm in the history will immediately occur..
 Affordable Robotic Vacuums Comparison : Eufy RoboVac 11S vs. Ecovacs Deebot N79S.
...hence I ordered two entry-level yet features-packed robotic vaccuum cleaners, hoping they could fight each other like what I saw them Battlebots do on Youtube...
 Car and House Wash in the Winter using the cordless SunJoe pressure washer (with video)
--... ...get the garden hose, the pressure washer, gas or another cord for power then drag them all to the driveway. By the time I finished all this, you probably completed 7 seasons of GoT..
Just an fyi the belt diagram posted here isn’t for a Corolla, it’s for a 4 runner. Everything else appears to be correct though, not sure why it was posted if it doesn’t correlate with anything else in the article. I am currently debating whether to do this repair on my 04 Corolla as the tensioner appears to be bad. I was wondering if there are any preventative measures one can take to avoid the bolt breaking when removing. I can think of a few methods that would work on other applications but would it be advised to use in this situation. I’ll list them and anyone can chime in if they agree or disagree. I also might mix them together if it would be the most effective. Ok first would it be advised to use heat before attempting bolt removal, I thought about buying one of those induction coil heaters to heat the bolt before trying to turn it. Second does simply using pb blaster or other penetrating oil have any real affect on traveling to the threads if everything is still intact prior to removal. Lastly would using a air hammer on a wrench or socket against the head of the bolt jar it enough for the threads to come free. What is the best course of action, just one of the suggestions or multiple used together. The hammer idea was just thrown in the mix, dont think it would do much except break the bolt before starting. Has heat or oil been effective for anyone and is it wise to use heat.
I have been trying this for a couple of days now, but my drill bits aren’t able to drill into the part of the bolt that’s in there. The guide makes it seem very easy to drill a hole and use the extractor but it hasn’t been easy for me, I’ve used lots of pressure and barely have a divot in the bolt.
Modified approach to an excellent tutorial – Tensioner Bolt extracted and replaced! – My 2000 Prizm.
I modified the approach. There is only 3″ clearance between the engine block and the … side wall – I used the DeWalt right angle adapter and used stubby 9/64″ and a #2 extractor. Also used the comment suggested idea to use an old book to distribute pressure in raising the engine via the oil pan to the correct height with the jack. New bolt installed and belt installed – Much thanks to the author of custompcguide.net step by step guide for even a novice.
See – Photos – at my Facebook page post: https://www.facebook.com/GreenTechLabs
Hi how did you drill the bolt out and put a 6 inch bolt through the old one with a bolt on the back? Im curious how you got a nut on the end of it. Wouldn’t that side be inside the motor casing or something? Trying to get one out myself thanks
Yes, the key is to slightly lift up the engine with the car jack and use the right angle drill in order to give you more room to wiggle.
Here is some good news for those who have broken the Dummy Tensioner Bolt that is normally used to reduce the tension on the Serpentine Belt to remove or install it on your engine.
Since, that bolt was broken, I could not reach the second bolt, which is normally hidden underneath the Tensioner Pulley, to fully remove the Tensioner Adjustment Assembly.
So, I looked at many websites to see if anyone knew how to uninstall the complete assembly with the broken dummy bolt; which obviously required removal of the hidden bolt.
Generally speaking, the only ideas I got were to drill another hole inside the Tensioner Assembly and then move the pulley to its locked pin position to get access to the normally hidden bolt.
Last night I got this idea: What would happen if I removed the Tensioner Pulley? Would that give me access to the hidden bolt?
Please note that I was doing this work on a 2003 Mercedes C240. So, it is possible that my solution might not work for all the Serpentine Belt Tensioner Assemblies of all the other cars on the planet.
In the morning, I went and bought the kit to open the Torx-50 bolt for about $16. It came with many other bolt removers; such as Torx-45, etc.
It took me about 20 seconds to unmount the Tensioner Pulley with my new tools. But, I was pleasantly surprised to see the hidden second bolt of the assembly. So, my problem was solved.
I removed the hidden and the other bolts off the Tensioner Assembly. Threw the damaged Tensioner Assembly away, and successfully installed my old Tensioner Assembly with my new Serpentine Belt.
This saved me at least $400 that many people seemed to have paid to handle similar issues with their Serpentine Belt Tensioner Assemblies. So, I thought I would pass this idea for others to benefit from my experience.
I just wanted to let you know the same exact thing happened on our 98 Corrola. The parts were located a little differently and required the movement of a few house and removal of the windshield cleaner fluid reservoir. Otherwise it worked like a charm!!! I used the power drill in reverse with the screw extractor after boring the hole and that thing pulled right out! Thank you so so so much!
did you figure out why the bolt was sheared off and how exactly it happened? Same thing happened to me and i want to make sure it doesnt happen again.
Apparently there is always a flux of this problem during the hot months, according to the views statistic of the article.
Dude, I’m on day 2 of trying this. Two broken screw extractors are in the bolt now. I would suggest something bigger than a #1 extractor.
Follow up: broke 3 extractors off trying this. Finally drilled through it with a 3/8 bit and put a 6 inch 3/8 bolt through it with a nut on the back. FYI, a tungsten carbide dremel bit and a chainsaw sharpener stone for the dremel are how I cut through the broken extractors.
Really a hassle, isn’t it!
Thanks so much for this information. I was able to get this bolt out using the exact bits shown in this article from Home Depot. I thought this was going to be a nightmare and torches and rethreading the bolt turns out easier than expected. This saved the day for my 2000 Toyota Corolla.
I totally understand that feeling of accomplishment!
Thank you so much for the write up! I just did it exactly as you did. Car runs like new.
I owe you my uttermost gratitude.
I’m so glad it’s helped you! Car repair is always a hassle but the sometimes it’s worth a try especially in our case.
Fabulous write up. I thought that I was TOTALLY screwed when the tensioner arm bolt broke. You were lucky to get away with a #1 extractor. I drilled a 5/16 hole in the bolt, used a #5 screw extractor, and the bolt wouldn’t even budge. I didn’t want to break the extractor off (worst of all possibilities), so I did some web research and came across CNC Freeze Off Super Penetrant. It’s supposed to have a refrigerant in it to contract the bolt and allow the penetrant to seep into the threads. It’s reddish in color so it may also have an ATF type penetrant. I know that a lot of people use ATF mixed with Acetone. Anyway, I sprayed some of this on a warmed up engine, waited a couple of minutes, and the bolt came out so easily I initially thought the extractor was slipping. I COULD NOT BELIEVE HOW WELL THIS STUFF WORKED! I was a complete PB Blaster groupie before this and no I have no association with CRC. It’s just great when you come across something that actually made the job easier.
Well, thank you for sharing this informative blog to fix the serpentine belt of the car and make it perfect to drive. As the lower bolt for the serpentine belt tensioner broke off due to torquing it down so be careful while doing this. Remove the belt using a deep socket and a ratchet with a cheater bar for extra leverage on that “pulley bolt” and roll the spring loaded tensioner assembly counterclockwise and slip the belt off the pulley and rest it over the socket. This removes the tensioner assembly from the engine, right hand thread and make your toyota car more flexible for delivering good performance. To get effective result by dong this type of service you may go through https://www.remptmotors.com/toyota.html.
Glad I found this page. One of the pulleys was making an intermitent squeal and yesterday the tensioner bolt broke just like you. Girlfirend wanted to buy a new car after I told her I would need to pull the engine to fix it. Glade I dont have to.
I need to replace my tensioner but the bolt is not broken off. The piece is just rattling. Is it necessary to lift the motor to remove/replace the tensioner if the bolt is still fine?
I had to lift the engine only to squeeze out that little extra room to access and drill the pilot hole. In your case, you probably don’t have to.
I had the same experience on my 2004 Corolla. I searched the web hoping to find a similar case and came out with this article. I just followed the intructions and managed to extract that broken bolt from the engine block and replaced it. I used an angle drill. It took me around 4 hours to do it. Kudos to the author.
Why did it take so long, that doesnt sound right.
Whats the best location placement of the jack under the engine?
Just wondering if anyone has contacted a local high school or trade school to see if possibly they might have a policy of accepting a repair project for a donation offer? I would guess there would be a release of liability form to sign? I would not be worried about handing off to a student, a relative simple repair that a good number of us have faced with the “broken bolt” problem. Just a thought…..
That could work, but you might need to leave the car all semster or bring it back the following semester. Why? Becuase all schools teach automotive in sections, so if the engine repair section is close at hand, you’re in luck. If it is the following spring or weeks later, you have that issue.
Generally you only pay out of pocket – and must obtain and deliver – parts and possibly fluids for replenishment. This again depends onthe section being taught. Always a waiver is signed by you before work can begin. And you are looking at least at the full section time taught, and probably for engine work, have to get the car there at the start of the taught section start date. And, you will be in a cue, so there is no garanteee that your car will be ready at any particular time.
Sad to say that the tensioner on my 2001 Corolla suffered this same problem. Drove it to a mechanic and wants $ 400 to lift the engine, remove broken screw left in the engine, I am 72, female and already have credit card debt, no family and no one to do what you suggest. After seeing your simple cure, I feel like crying not knowing what to do. Car has not been worked on yet. I live in Jacksonville, Florida
You could try
– Get a list of as many local auto repair in your areas as possible.
– Contact them via email, share your story.
– Link them to this post, ask if they can perform this job and the cost associated.
Most honest mechanics would accept to help you get this done without making you lose an arm or leg paying for it. Best of luck!
Thanks bro just what i needed someone with experience
Thanks a lot!!! Just finished to remove the broken bolt!!! I installed a complete new bolt, tensioner and belt!!! Thanks !!!
Hey nice job, glad I found you. I had all the tools from other repairs. Beginning to get it done. Thanks!
Hi!! My Car did the same thing ! I had the bolt replaced and the new one Brke also !! What would make it break like that
Make sure all the tensioner part actually moves when my first belt was replaced I noticed that it squealed. The bolt that held the assembly was too tight. Leading to the bolt breakage.
I’m going to go ahead and replace the tensioner as well. I found it online for $35 so it seems worth the cost to not have to go through this again.
Thanks a lot for all the great info really help me out big time man had the same problem with my 2005 Pontiac vibe I follow all your instructions and boom got it out thanks to u for that You save me a lot of money and time . Thanks man
I followed the fix on this issue and it has been six months. No problems at all. Just be sure to tighten the bolt to the recommended torque. Now, if I can just find that $1,000.00 I saved!
haha well, like I said in How do people make $50,000 a month online, a penny saved is 2 pennies earned.
Thanks a lot for all the great info really help me out big time man had the same problem with my 2003 Toyota corolla s follow all your instructions and boom got it out thanks to u for that save me a lot of $$$
Glad it helped you. I’m still surprised as of how this is a much more common issue than I thought it was.
Just did this today, worked great. It was a lot easier than I though it would be. Only thing I did different was use the cars jack (from trunk) with and old book between it and the oil pan.
Thank you.
Nice improvisation on the situation!
It’s totally worth spending 100.00 on a Walmart Pnuematic jack – and if a jack stand can fit in there also, for extra safety, totally wort it.
Same thing happened to my friends corolla…. I figured out that the tension pulley has a set of bearings where the bolt goes through allowing the tensioner to move when the engine is running…. The bearings on my friends tensioner where seized which put a lot of stress on the bolt and snapped it…… The pulley needs to move when engine is running cause the belt extends and contracts during the different RPM ranges
Thanks a lot for the great info !
So I got mine fixed and the same thing happened again less then 2 months later. You have any idea why the bolt keeps breaking?
Torque on the bolt, maybe? But I’d also recommend to have a mechanic look at your alternator or the water pump for anything unsual as well.
Thank you for this hint. I had a similar problem but on a BMW 2006 E90. The bolt head for the belt tensioner sheared off. I used your laundry list and advise and was able to easily remove the bolt.
Glad it could help! Now to think of it, I’m impressed that I actually made it home from a 6-mile trip then without killing the car. There was no steering assistant, no a/c, no alternator and ofc no water pump.
Use a left hand drill bit and the broken piece will back out as you are drilling. Just did it today.
Thanks for the great advice, Steve!
HI, so i got to the part where i put the drill bit into the hole where the broken bolt is but since the space i have to work with is so tight, I cannot see what I am doing so i cant get the drill positioned just right to get the screw out. I lifted the engine like you said. If i lift in any higher to reach the hole well, I am afraid ill cause some other issue on the other side of the engine block. any suggestions?