What are the best theme functions snippets for WordPress? How can HTTP/2 make my site nearly 100% faster than HTTP/1.1?
How to speed up admin-ajax.php? The best setting for W3TC caching methods –disk, disk:enhanced or APC? What kind of css and script embeding is faster: async or defer? Perhaps inline?
How to turn small image into data uri and embed into css to save more http request? Combinging google fonts? Who is a good cdn provider, also cloudflare or paid?… and many more questions answered. You’ll learn a lot from this potentially-miscounted 10,000-word WordPress optimization guide today, like no other guide could ever do before.
Here are what to expect:
 To get thing started, we first go over the easy modifications or some light-weight plugins that you could simply install on the blog and be done with. Nothing crazy, every rocket engineer and their rocket know about them. Gradually towards the end of the article, you will be slightly challenged with more tidious tasks but the results are very well worth it.
I’m sure by the end of this article your WordPress site will load at least 65% faster than it does right now. 60% of the time, it works 99% every time. Many of the tips I’m going to demonstrate here are either from my own fiddling or scientifically researched and medically found from the highest classified documents of the best and most successful bloggers on the Internet because they forgot to tape their laptop webcam (thanks CIA).
One important precaution is make sure you proceed slowly carefully when it gets more technical, have FTP access ready just in case and back up things that you are about to break, because you will break them. Don’t cry to me when you completely wasted your site because you didn’t listen to said advice. You don’t know how many times my wife passionately said to me: “I told you so!”.
However, the good news is that recent update of WordPress implements a new PHP error protection feature, which allows you bypass the blank page when a php error occurs and fix the problem directly without requiring local file access for debugging. Still, better safe than sorry.
Table of Content |
*This table of content also appears on the right sidebar on your desktop screen later as you scroll along the article, whenever it feels more confident. |
1 – Proper Cache Plugins
WP Super Cache and W3 Total Cache are two of the most popular WordPress cache plugins available for free in WordPress plugin depository. It’s difficult to truly determine which one of them is faster than another, or the fastest.
If you have binged around lately, you may find many WordPress gurus who attempt to test the performance of these cache plugins using online page load benchmark tools such as GTmetrix, Pingdom or even the recently revised Lighthouse Google pagespeed. However you must know that these services are only meant to test how fast objects on your site are loaded and then structuring a score –which depends on many different factors; hence you should not be surprised when you see different results after each run.
When you are going after the pagespeed score, it’s like chasing the mpg when you are driving. Sometimes that takes away the fun (pretty design), the experience (compelling content at first glance) and practical features (no spare tire in the trunk because it hurts mpg!). On top of that every page is a different road terrain.
Some people get the most expensive summer tires for normal road which gives them the best mpg, but never pay attentions to other road conditions and weather that may affect the overall experience of the road trip.
Visitors on an ecommerce site just don’t stop at the homepage and say, “Oh thanks the old God and the new, I have shopped enough, now please max out my credit card!!”. But everyone keeps trying to optimize the homepage for the 100/100 while the rest takes 10s to load.
The peffect score, perfect mpg could also be the most boring site. It is a great guidance but once you become obsessed with the score it quickly becomes a text book mistake. A site can be fast, beautiful and not even achieving 90/90, that happens all the time. Especially under http/2 protocol that I will explain later below, it’s totally different to traditional sequential download of protocol 1.1 where these benchmark sites are measuring.
I set up this ecommerce site for my wife a couple years ago under a combination of Varnish + Redish + Memcache + CDN + HTTP/2, fully optimize the core instead of just one particular page and I have yet a complaint about it being slow. In fact, it’s always compliment about the look and feel — “it’s so cute, it’s really nice, great cards, love the beanie, etc…” and it has a 69/89 on pagespeed.
Which brings me back to my point: these services are not capable of testing how the cache plugin actually runs or behaves in the background. Which made me wonder: how is it possible that most of those guru sites guarantee that the $39 WP Rocket cache plugin via their affiliate link is faster than many other free cache plugins? The newbie installs the paid plugin and notices the score improves over the old free cache plugin (that they didn’t set up correctly to begin with) and declares the paid plugin is way better.
Well, it may make the site seems to load super fast on the test at this very moment, but when you pay for the premium of simplicity there is a chance that you don’t know what’s going behind the scene and that may potentially hurt the underlaying performance of the site on the long run –more significantly, can it handle the requests during spike of traffic? or upon the infamous Reddit hug?
And most unfortunately, the person who run the tests usually only use their front page as the lab rat and they are shy away from other pages; which further increases the inaccuracy of the results. Why is that?
If you know anything about people who like to do website optimization, we’re too obsessed to optimize the love out of the homepage all the time and only this page, hence this particular page tends to be the most light-weight, fastest-loading page of the entire website.
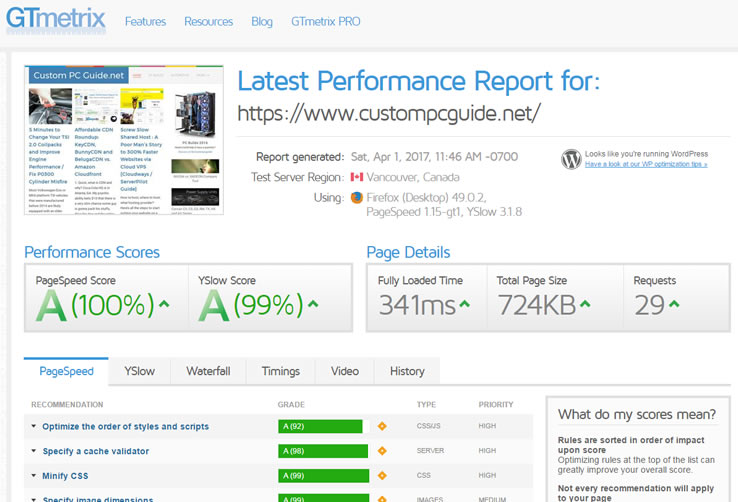
See the screenshot here, I could achieve a Saiyan God load time for Custom PC Guide.net no problem.
Testing this page is no different than trusting a girl’s profile picture vs. real life morning wake up. They are both probably beautiful I hope, unless you were drunk the night before and you are also in Thailand.
So what we will be doing now is showing you the most optimal settings for each of these cache plugins in stead of chasing the score.
You read about them and decide which one you’re more comfortable to play around with. At the end of the day, they are all just application-level cache systems (a.k.a a dependent of wordpress platform) which generate a static webpage from a dynamic webpage to reduce server resource consumption. They are not too much difference to one another, good but not as great as server cache engines such as Redis or Varnish; which are often available on premium hosting service or on Cloudways.
The best of both worlds would be of course, having implementation of all of these cache platforms. You’re not likely to get such opportunity on a shared hosting plan, though it’s worth to ask the provider whether Varnish/Redis is available. If not you should switch to a low cost Cloud VPS like I did –it’s more reliable, faster and for $3.5 to $11/mo you can host as many sites on it as you want (probably at least 3 sites depends on the traffic).
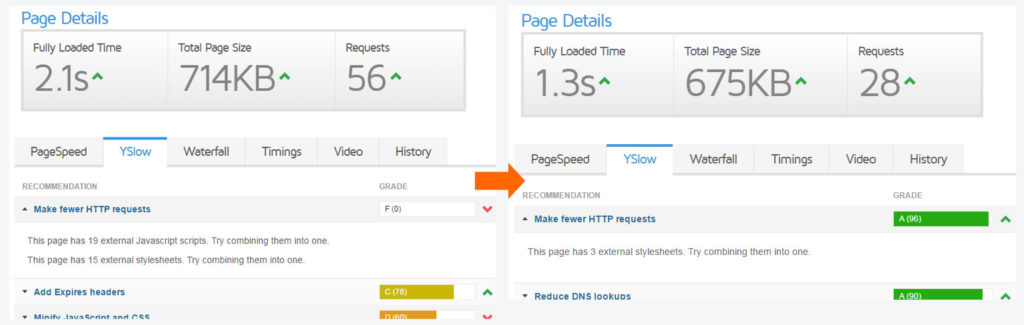
Anyway, I digress. So if you haven’t done this already, let’s go against everything I said above and start a scan on your site using GTmetrix. But don’t worry, it is to know where your site stands in term of speed and network latency right now. Other than that we will have no more use of this result.
Save the URL so you can come back and compare again when everything is done after this article. The power of not chasing the scores but solving the underlaying issues is coming your way.
Now Pick and Read the cache system you’d like to go with below.
Small site on shared host should start with WP Super Cache.
W3 Total Cache is recommended for Dedicated/VPS environments –you can get a Vultr VPS and Runcloud for total of $3.50/mo —save our VPS setup/migration guide here because you may want to visit that article if everything you do here still does not satisfy your performance expectation with shared host.
Either way, I’ll show you how to get the best out of it for free –and put those sites that use paid plugin such as WP Rocket in the dust at the same time.
In fact, you could probably open a WP optimization business right after everything said and done here. And like Lao Tzu always said, “Don’t forget me when you billionaire, mate!”. Share this link for a WP fellow who’s still struggling.
Wp Super Cache has a very friendly interface and easy to set up. It lacks a few advanced features that W3 Total Cache has such as content minification, types of caching methods, header controls and support for server cache engines –but it’s lightweight and more than sufficient to help your site run faster under a shared host environment.
Upon successful activation, navigate to the plugin configuration page under Settings > Wp Super Cache > Advanced and apply the following setups.
Caching
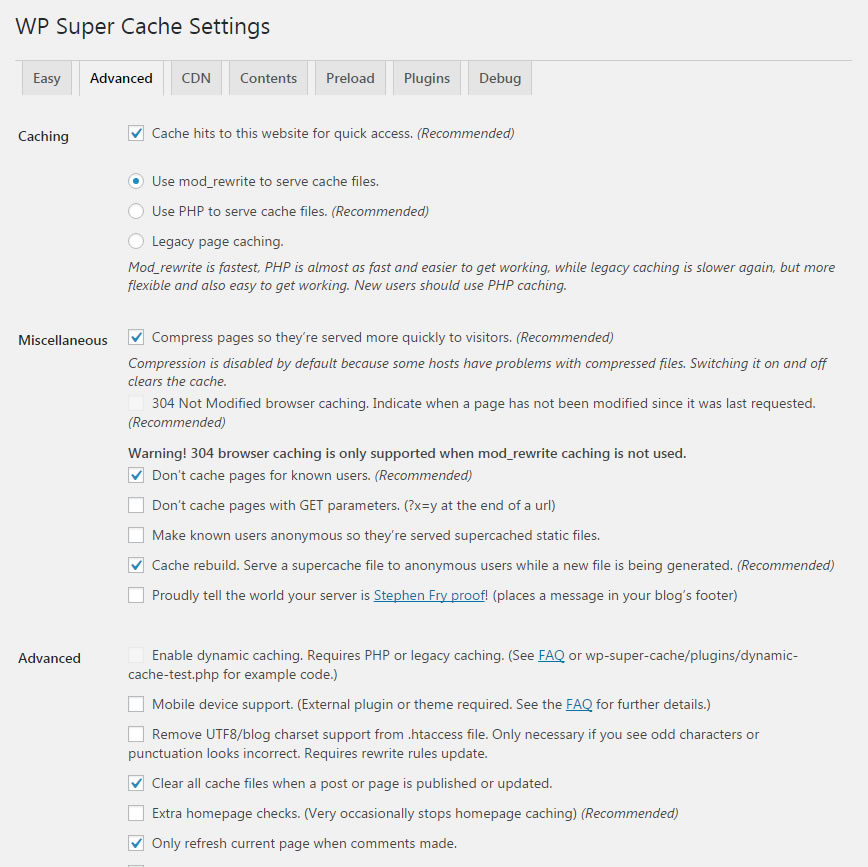
- Cache hits to this website for quick access: This setting means that once a dynamic page has been visited for the first time, it will be added into the cache folder to be served next time as a static page. It should be enabled; but if you have Preload mode on, that setting will supersede this one.
- Use mod_rewrite to serve cache files: In other words, this option permits WP Super Cache to set up instruction for your server in .htaccess file that tells the server to deliver cached pages to your visitors.Not quite getting it? Basically, WP Super Cache tells the server that when someone visits xyz page –go look in this abc cache folder first, to see if there is already a gzipped (compressed) static file of this page ready to be served. This way, server doesn’t have to make it again for anonymous users. This method is known as Disk caching and should be used over other older methods, but it requires Apache mod_rewrite running on your server. Don’t worry though, there is no way your host doesn’t have this already enabled. What you should be worried about is the performance of your shared host’s storage if you are using one.
- Use PHP to serve cache files: Same fashion as the option above, but there is no instruction for the server in the .htaccess file to follow. Instead the method of caching requires the server to think for itself a little –where the cached files are and should it be served to the current visitor? This takes a bit of processing power, but it’s minimal. Yet it’s not recommended on big traffic site at all.
- Legacy page caching: avoid at all cost if possible. This caching setting does not make sense on most site. It caches data for specific logged-in users, meaning every logged-in user has his own cached page. It’s also slower than other methods.
Miscellaneous
- Compress pages so they’re served more quickly to visitors: enable compression (gzip) for smaller page size. It’s usually a reduction of 60-80% of the original size, well worth it. Most modern server supports this function. WP Super Cache however, does not apply GZIP on other static components of the page such as CSS and JS files hence you may need to apply more htaccess code later via section 6 of this article for the best result.
- The rest of other settings on this page should be left as default.

Preload
Preload is a process that generating static pages from dynamic posts / pages in your blog ahead of time.
It’s a very simple concept. Imagine you go to church on Sunday and there they are, selling dough. You’ve been avoiding them all week and here you are, must follow bible teaching, finally decide to buy them some cookies on good will. Fortunately you don’t have to wait for them to make the cookies, it’d take all day long.
So Preload is just like making a bunch of cookies ahead to sell to the customers and innocent pedestrians, instead of really baking one on the spot.
But props to these girl scouts, they work very hard and scream all days. Support them if you see their table, I always ended up buying 10 boxes to earn my national bragging right. If I had to stand all day selling cookies I probably start threatening people sooner or later.
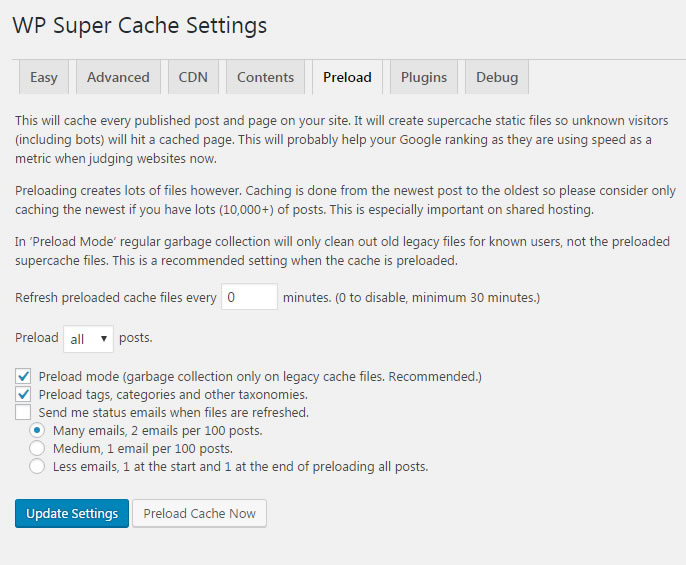
- Refresh preloaded cache files every x minutes: on a high traffic website, there is no need to refresh the cached pages too often. Your server takes a hit when this process runs. Hence, leave it for a day (1440), a week (10080) or disable to not refreshing the cache at all.
- Preload mode: This setting follows the minute rule above, but when the time is up it only wipes out old and wrinkle pages; such as a cached profile page of user ladyboyneedslove69. His last visit was weeks ago so it’s not necessary to keep a cached version of this page anymore. This prevents the server from removing cached posts and pages which visited more often.
- Preload tags, categories and other taxonomies: You should definitely enable this option. It lets the plugin not only preload posts and pages but also preload categories, post tags, post formats otherwise would usually cause a huge slow down on your site.
This plugin is like Jenny in Forrest Gump, poor girl.
You either understand how it works, or ended up hating it. A majority of people would give W3 Total Cache a bad rap because it makes their site slower. In many cases, it breaks the whole thing then runs away. Turned out, the issue lies with the hosting service that they were using, especially under shared host environment, not the plugin itself.
W3 Total Cache has a bunch of advanced options that if not configured carefully, could become a two-headed knife problem to your website performance. You see, they are not really like peas and carrots after all. With that in mind, if you are currently using a slow shared host plan I recommend you to stick with WP Super Cache instead.
On the other hand, if you are currently with DreamHost, Siteground, A2 Hosting, WP Engine, Digital Ocean, Vultr, Linode or other VPS, be sure to try W3TC. Those are the decent hosts that could accommodate a myriad of complex caching methods W3 Total Cache has to offer. In my example, I’m using Cloudways for Custom PC Guide.
Ok, time to get into this shrimp business.
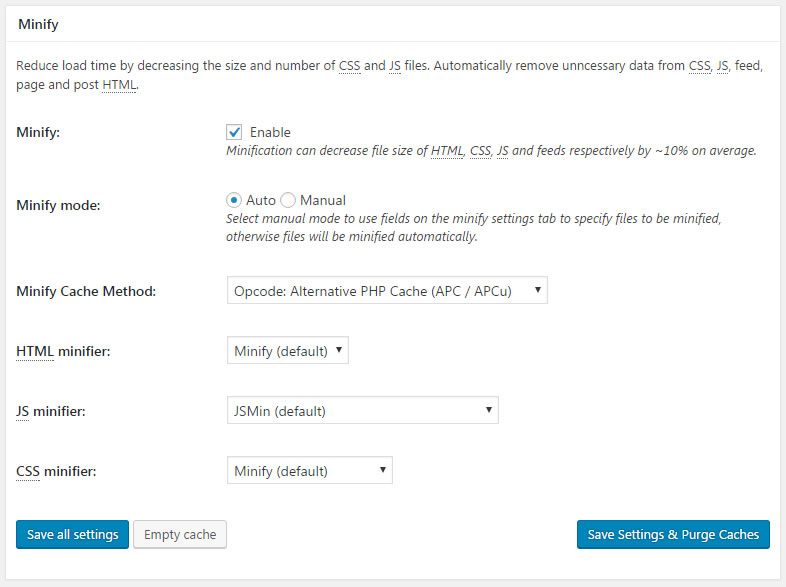
Performance > General Settings
- Page Cache: As the name implies, this option enables caching of posts and pages on your website.
The Page Cache Method is the one we should pay more attention to. Disk: Basic and Disk: Enhanced are two method that works great under shared hosting plan. However, if the disk activity on your server is high and it’s not SSD, you may achieve worse result.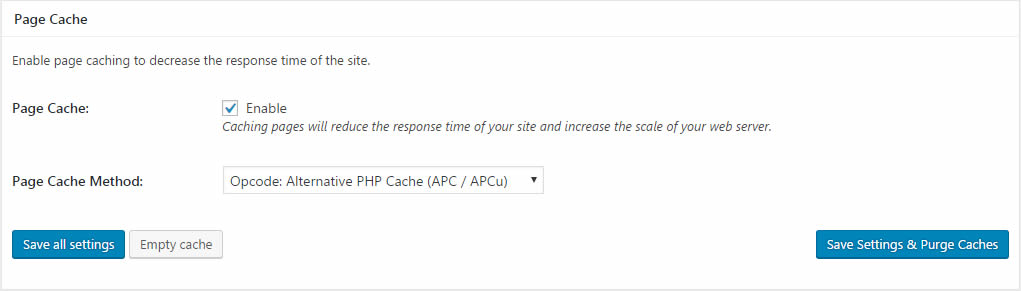 Meanwhile, if Opcode: Alternative PHP Cache option is available, this is the feature you most definitely want to use.
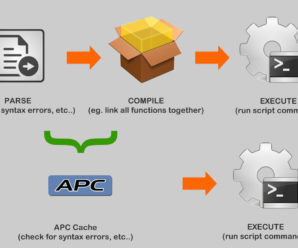
Basically, this cache system injects itself into the processing phases where WordPress parses and compiles the PHP script. It then caches all those steps and holds them in system RAM for future access. This easily speeds up the site 2x-3x times over traditional compilation, even though the caching system is a little dated.
The drawback is it has a higher memory usage, hence you may find many people complain about their hosting provider puts a stop on their website because this script is eating up the shared resources. That’s true because it needs the memory to keep your PHP data ready, it’s the small price to pay in order to improve faster page load. Here I is put together a diagram to help you understand APC cache better.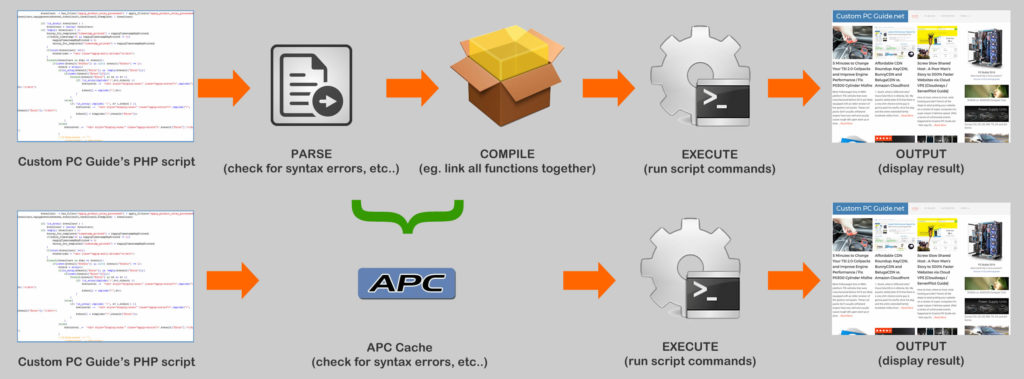
As you can see, APC could improve PHP performance by 50% or more –partially thanks to the memory cache vs. slower mechanical disk cache.
- Opcode Cache: leave it as default.
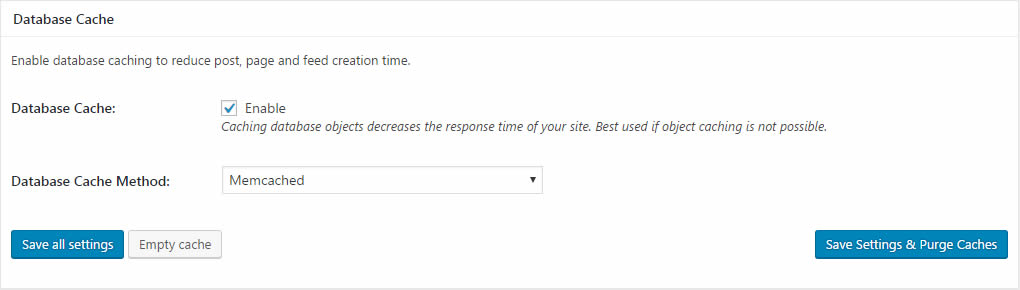
- Database Cache: set to Memcached. As APC cache is for PHP, Memcache is for database and it holds database results in the memory to reduce query stress on your server. Guess what the shared host provider typically says about it? “Your stuff is consuming an unusual high amount of system memory, we cannot allow this! NEIN!!” –Hitler.
- Object Cache: If your server supports Redis cache, this is the time to use it for Object Cache. Cloudways user can turn on Redis via your Platform control panel.
Any other caching method except Memcached or Redis will potentially slow down your front-end and admin dashboard. As opposed to Database cache where it deals with post and page content as a whole, Object cache deals with expensive individual database query that could be taxing on the server. These type of caches should never be under Disk method.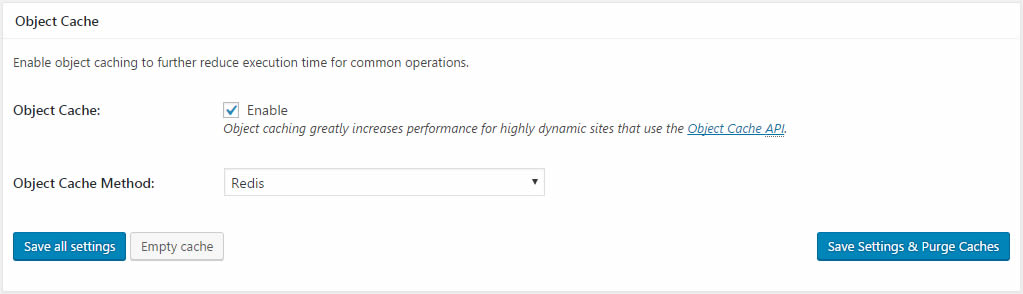
- Browser Cache: must check, explain later.
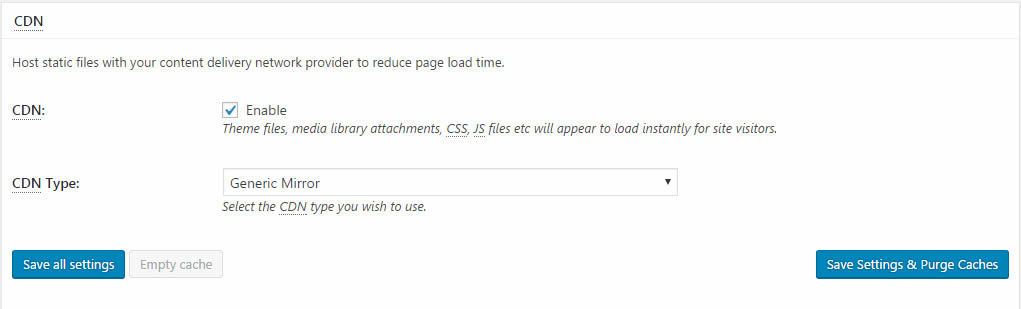
- CDN: If you site utilizes a content delivery network, check the box and choose your CDN provider in the list. If it isn’t a major CDN, choose Generic Mirror. You can read about the whole CDN stuff here, we put in this article some of the worst jokes to date: Affordable CDN Roundup: KeyCDN, BunnyCDN and BelugaCDN vs. Amazon Cloudfront.
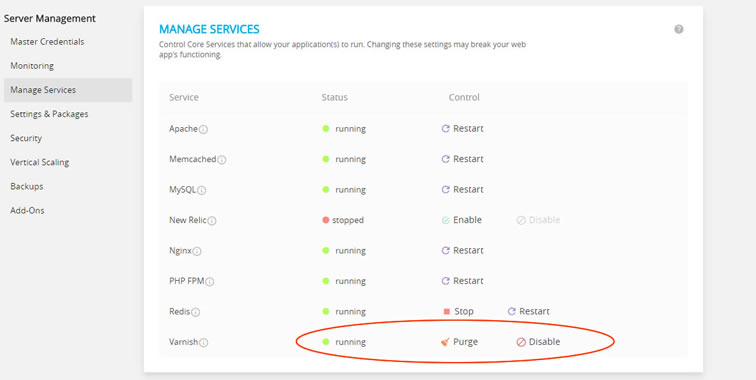
- Reverse Proxy: It’s about time you grow to love this superhero bunny if you haven’t known about him already.
 This is Varnish cache. It’s not a small-scale application cache system like WP Super Cache or W3 Total Cache, it is an independent server application just like Redis –a very brutally fast one at that. Unfortunately, Varnish is not typically available on shared host environment so you may not be able to use this feature.
Now let’s take a look at how Varnish works.
There are two ways the sysadmin would setup Varnish: they either run it on a separate server, or on the same server (apache) as your WordPress website if this server is powerful enough (eg. Cloud VPS).
Once in place, Varnish becomes an epic gateway between the visitor and WordPress where it stores and serves cache data to the visitors dynamically. As the result, your real WordPress server behind does not even have to fire up WordPress engine and then fire up cache applications for static cache data. Having Varnish like a meatshield, WordPress probably sleeps through the entire Winter. Typing this makes me wanna listen to GoT theme song again. Actually, why not open that in the background and feel epic while optimizing.
Anyway, I made a simplified illustration for you here.. 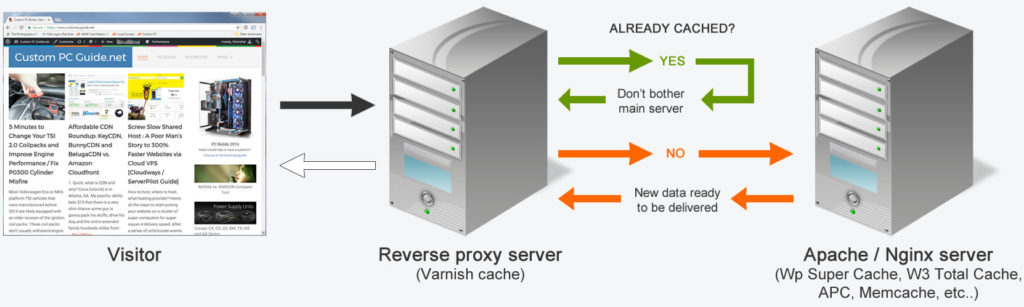
…but also check out the official youtube video of Varnish cache for better understanding of the system.
Now back to the W3 Total Cache, what value are you going to fill in the Varnish servers input?
It’ll be the local IP address of your Varnish server. You can only find out this piece of information by checking with your host provider, whether they have Varnish setup and where it is located. On Cloudways, it will be the original application url of your website.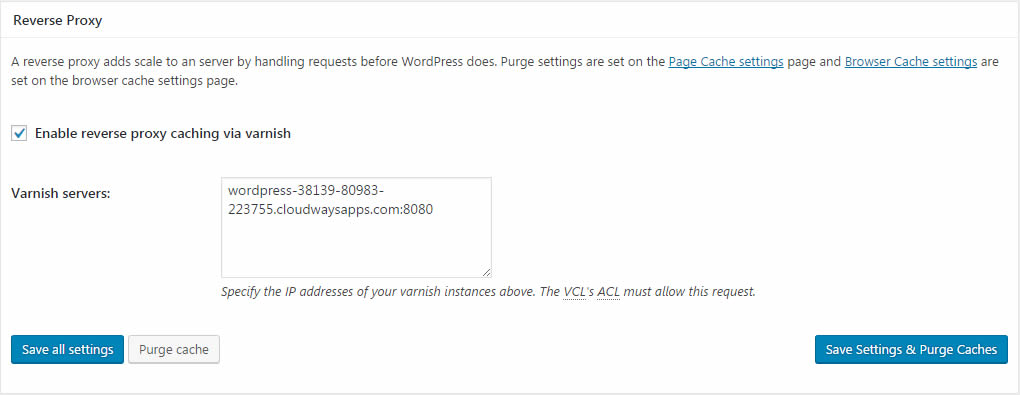
- Other settings: the rest of other options on this page can be left as is.
Performance > Page Cache
Apply the follow options, with the exception for Cache 404 (not found) pages. Uncheck it if you are using Disk as a caching method for Page Cache.
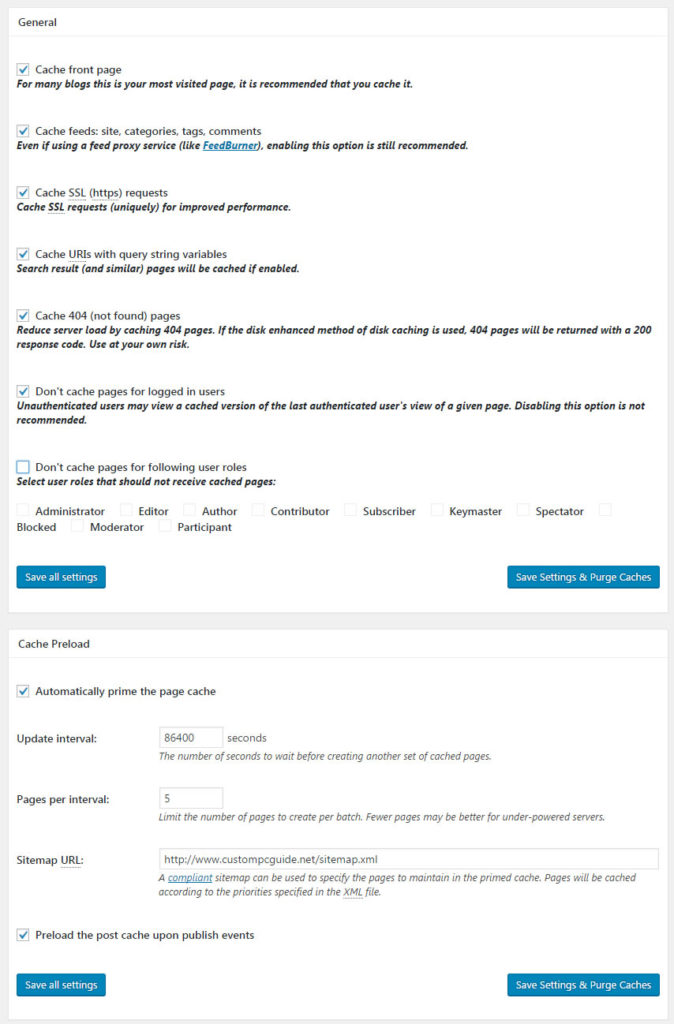
- Automatically prime the page cache: if you recall the Preload feature of WP Super Cache, this option enables the same functionality. It means W3 Total Cache will proactively generate all the pages on your website prior to a user’s visit. It makes pages load faster for everyone but once in a while when the cache has to be refreshed, it might take a toll on slow server.
- Update interval: this setting instructs W3 Total Cache to refresh the preload data every day (86400), week (604800) or month (2592000).
- Pages per interval: declares how many pages should be preloaded at a time during the process. The higher the page counts, the more it taxes on server’s resources.
- Sitemap URL: if you have a sitemap available, input the url here. It helps W3 Total Cache go through the Preload job faster. If you don’t have a sitemap yet, install Google XML Sitemaps plugin for your website to make one. All in one SEO pack also has this feature built-in.
- Other settings: the rest of other options on this page can be left as is. For now.
Performance > Database Cache
There is not much to be changed on this page, either. Only one setting that you should add into Ignored query stems box is:
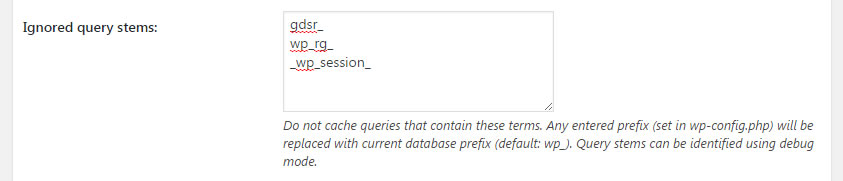
*Also click the Test button at the top of this page to verify the caching method is working properly.
Performance > Object Cache
Leave everything as default. Trust me, I’m the Iron First.
*Also click the Test button at the top of this page to verify the caching method is working properly.
Performance > Browser Cache
The cache settings here deal directly with the visitor’s browser. It basically tells how the browser should behave with the data it received from your website. Toggle the follow settings on:
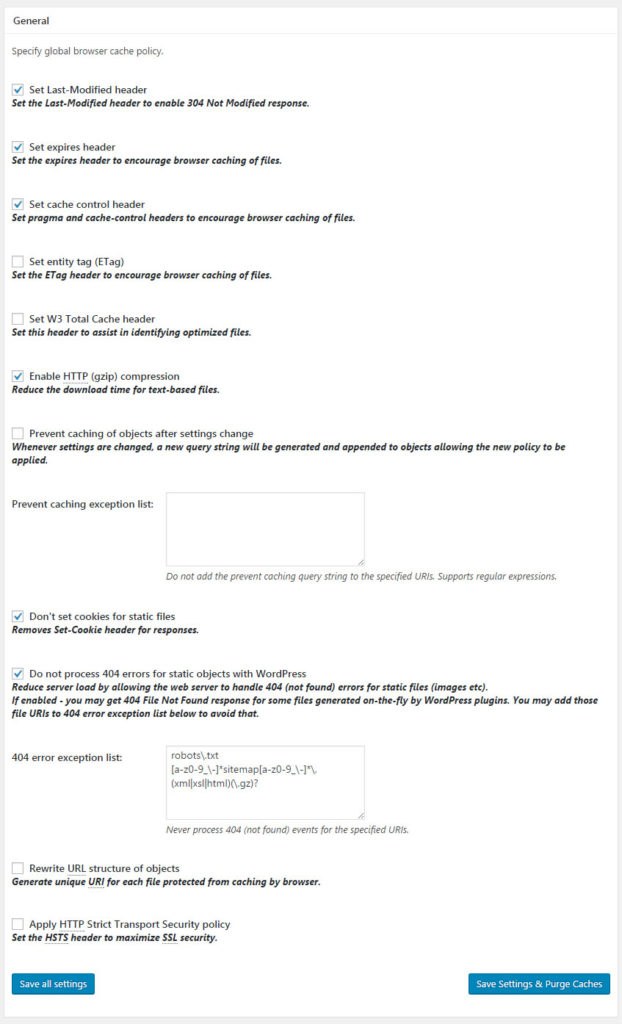
- Don’t set cookies for static files: this is a particular important setting if you are using a CDN for your website. It helps prevent cookieless domain issue of cached static file on the CDN server. Not something major but it may affect your scores on GTmetrix if you’re obsessed with the numbers.
2 – Minification Plugins
Our goal at this point is to put your page content on a more healthy diet so they could be downloaded faster.
Most modern website are very well-designed in term of look and feel plus a ton of different funtionalities. What people see on the surface is a beautiful theme with sleek layout; yet what the browser may find behind is a completely horrible, bloated system with poor integration of dozen of javascript add-ons and another dozen of stylesheets for all the fancy stuffs going on on the homepage. It’s a total chaos.
A cache system may help carry the heavy computing works off the server, but it’s only half of the story. Even when a cookie is pre-made and your customers don’t have to wait long to get their hands on one, but if every bite tastes like Gollum’s bread then they are sure as hell not coming back. So what we are going to do now is setting up some plugins that can tune up the delivery of content on your site by minifying and combining of components in the source.
Don’t worry, everything is still basic and easy to follow ahead.

Advanced minification plugin could also perform another task known as combining. What it does is it processes and merges mutiple javascript files or css files into just one or two files. This really helps with the page speed because of instead of having 20-30 requests to download 20-30 files, now the browser only has to make 2-4 requests to get everything it needs.
In our case, Custom PC Guide manages to reduce from a total of over 12 different CSS to one single CSS in the top head area of the page. That is just the top along, it also works in the footer of the page as well.

I choose this plugin because it has a solid track record of great compability to many different WordPress websites. Meaning it’s less likely going to break your website like others. For example:
- Better WordPress Minify: Great plugin but requires too much work from the admin. Non-tech users may not know what you are doing and probably send your site straight to the highway to hell.
- Fast Velocity Minify: simple to use, easy to setup but it breaks my Ecommerce site. It may work well for you, though.
I recommend to use Autoptimize with WP Super Cache or other cache plugins, except W3 Total Cache. The reason is W3 Total Cache also has minification feature included. However you can turn off W3 Total Cache’s Minify and use Autoptimize instead, but only when W3 Total Cache’s Minify breaks your site. The less additional optimization plugins you have to use, the better to avoid conflicts.
Autoptimize Settings > HTML Options
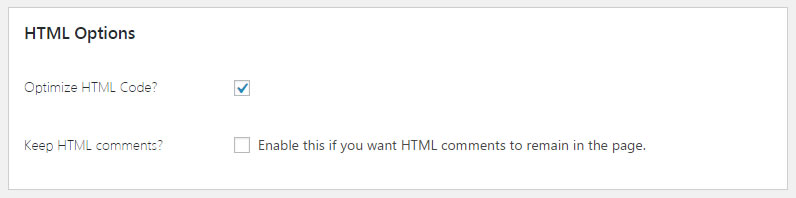
- Optimize HTML Code: Check this box which permits Autoptimize to apply minification to the HTML output of your page. Meaning once the server finished generating the page or retrieving the cache version of said page, Autotopmize steps in to tidy up the content source; making it lighter in weight for the visitor.
- Keep HTML comments: Usually, it’s safe to remove source comments in HTML output. So uncheck this.
Autoptimize Settings > JavaScript Options
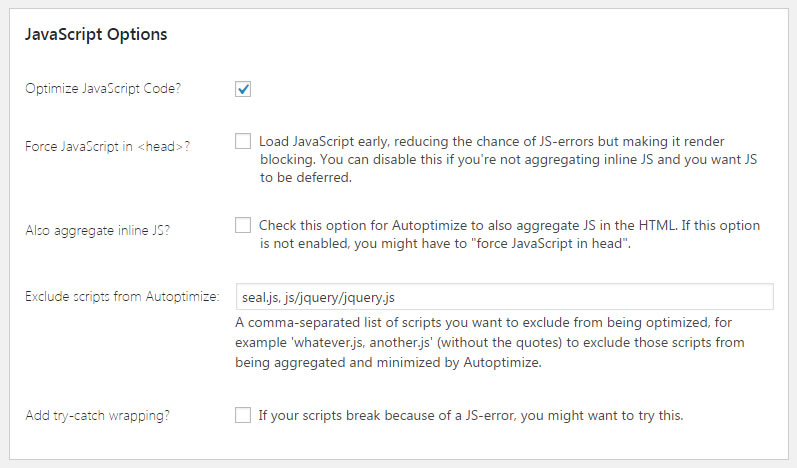
- Optimize JavaScript Code: as soon as you turn on this option, click Save changes and Empty Cache. Then head over to your website and investigate different pages/posts to see if everything works ok. If not, don’t turn it off just yet. Fiddle with the next few options.
- Force JavaScript in <head>: moving all scripts to the top of the page, forcing the browser to download them at the beginning of page load. It’s great if the combination of all scripts is smaller than 70Kb, otherwise your score on GTmetrix will be affected. Large scripts at the top also slow down the display of the page, unless your server supports HTTP/2 protocol which speeds up the delivery of these files DRAMATICALLY (WHY ARE WE YELLING???)
- Also aggregate inline JS: IF YOUR SITE BREAKS EALIER, SWITCH THIS ON!
Well, there is a chance it’ll fix the issue. Sometimes when Autotimize concatenates external script files, it makes the inline javascript code that’s supposed to be with a particular external script file an orphan. Merging this part into the the minified script potentially puts the mother and the daughter next to one another again thus solving the problem. - Exclude scripts from Autoptimize: this is another option to fix a broken page due to javascript errors. Leave everything untouched if there is nothing wrong on your site. If something is off, you have to go over all the scripts on the page and put the name in one by one until you learn which one is the culprit.
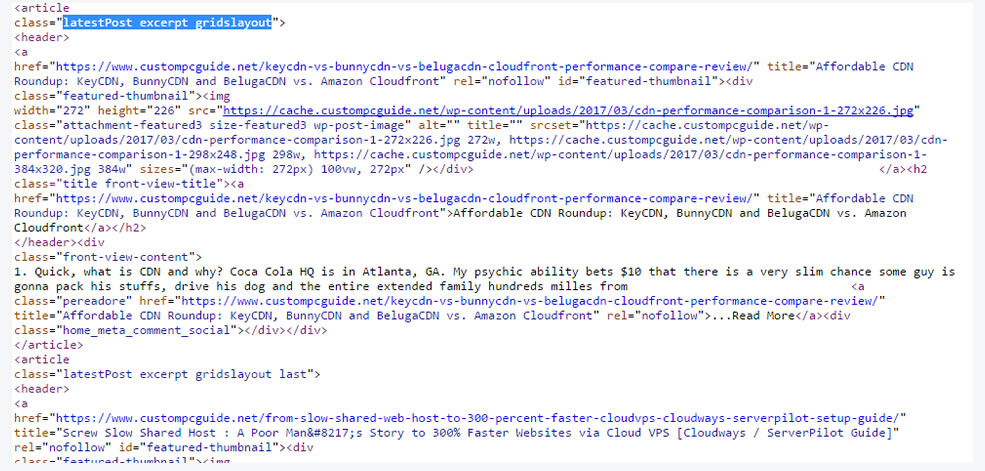
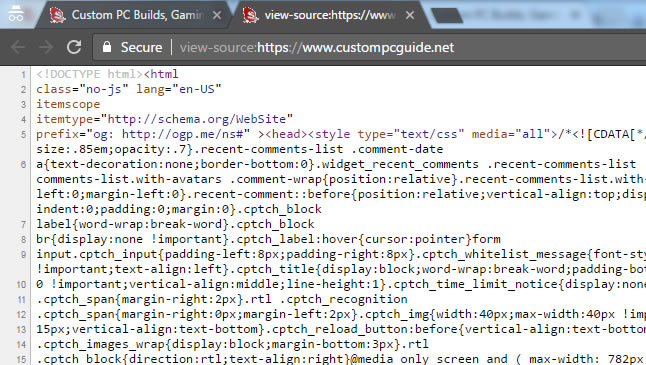
In order to do that, turn off Optimize JavaScript Code and view the source of your page to find what scripts are running.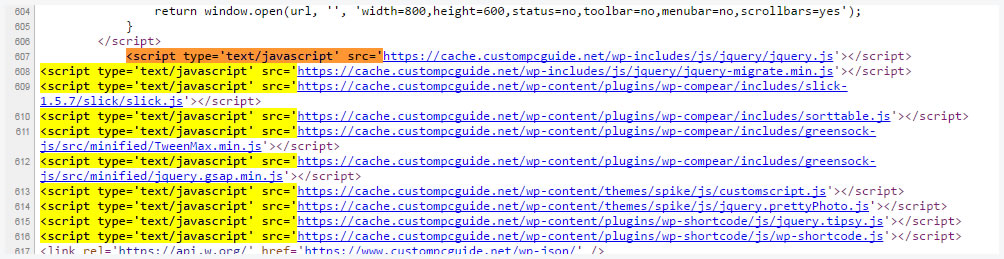
- Add try-catch wrapping: this option puts all aggregated javascript files into a try-catch-block that might be able to prevent error in one javascript file from stopping all other scripts, as the cost of some performance hit on your site. Not recommended. Work it out with Exclude scripts from Autoptimize setting instead.
Autoptimize Settings > CSS Options
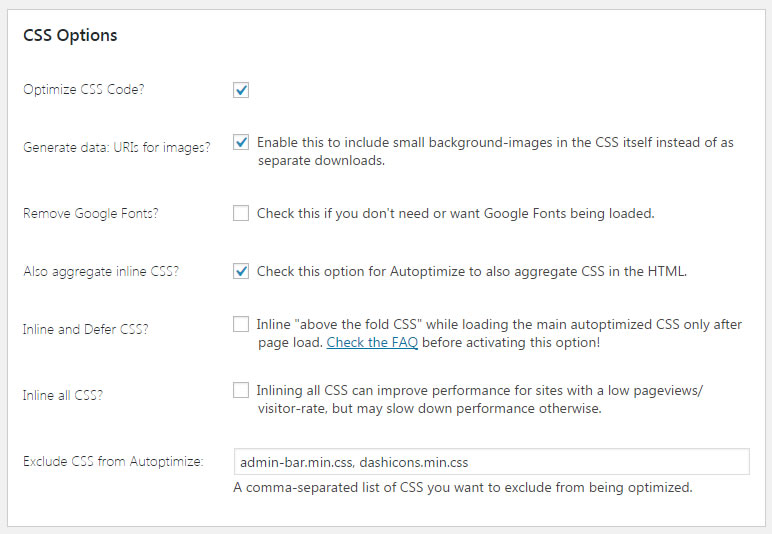
- Optimize CSS Code: follow the same procedure as JavaScript Options above. Turn it on, check site. Once everything is looking good, you can move on to the next option. The reason we’re doing this is because it iss easier to identify where and when an incompatible issue occurs so we can quickly fix it.
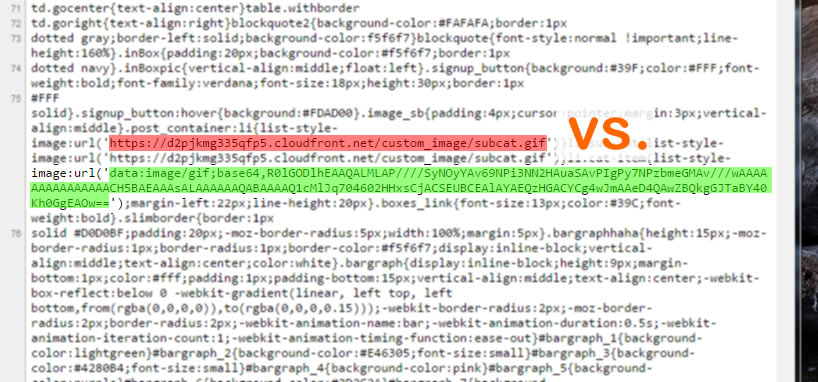
- Generate data: URIs for images: I really like this option. It sure help reduces the number of requests on your website. For instance, assume you have a social media icon at the bottom of your page, the browser has to look up where this icon is then generate a request to download it. Every request adds latency to your page speed.This option converts these small icons and images into codes that could be directly embded into the source file, hence the browser doesn’t have to download it separately anymore. Now Autoptimize may miss some of the images, but worry not –we will do them manually later in this article.
- Remove Google Fonts: Sometimes other plugins and the theme itself make call for Google font separately, thus generating unnecessary multiple requests for different Google fonts. You can use this option to remove these calls altogether and just manually run one request for all Google fonts being used on the site; using this formula:
Based on the formula above and WordPress enqueue format, you can put this into theme functions.php to request any Google fonts of your liking.
- Also aggregate inline CSS: inline CSS is stylesheet code that’s written directly into HTML source. When Autoptimize links external stylesheet files together, you can tell Autoptimize might as well move the inline CSS from HTML source into the new concatenated CSS file to reduce HTML source size. However, most inline CSS help structuring the basics of your theme layout; especially above the fold area which gives the impression that the page renders very fast, therefore I recommend to leave this option unchecked.
- Inline and Defer CSS: this setting requires you to look at the HTML source, figure out the above-the-fold CSS and paste it here. In my opinion, it may make life more difficult for you in the future to work with CSS changes. But if you are willing to go on the road less traveled, it not only helps pages rendered faster but also increases SEO for Google; because they recommend non-essential CSS to be deferred further down the the page.
- Inline all CSS: It’s not wise to dump all the CSS into the source and balloons your pages up like a triple patty big mac. Uncheck!
- Exclude CSS from Autoptimize: mostly use for debugging purpose, similar to the Javascript option above.
Autoptimize Settings > CDN Options
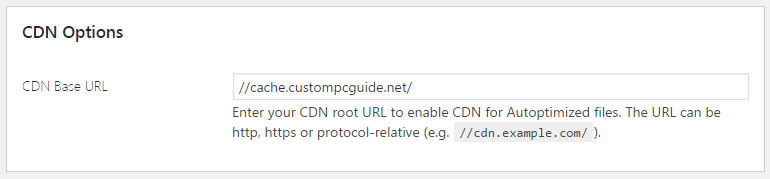
If you want Autoptimize’s cached css and js files to be delievered by a CDN, declare the CDN url here. Take a look at our CDN roundup if you don’t already have one. Those who are using Cloudflare, you don’t need to do anything here.
Though W3TC may not combine as many as scripts file as Autoptimize, but it’s also safer that way where existing scripts are merged and placed closer to where they previously were. For example, Autoptimize scans your page and combines all the javascript files into one file while W3TC combines javascript files by section: top head, body, footer; hence you may have three or more separate cached scripts scattered throughout the page. If you are obssessed with GTmetrix score, this definitely gives you a lower score than Autoptimize due to more file requests, but there is more to it than just request counts, read on!
Go to Performance > General, and apply the following settings.
Note that we’d pick APC over Disk:Enhanced due to reasons previously explained in W3 Total Cache section at the top of this page. In short, Opcode: Alternative PHP Cache is a memory-based caching method which is a lot faster than disk-based caching method. Keep in mind that it also consumes more RAM on your server, thus shared host provider may frown upon the consistent usage of system memory if you have a high traffic site.
Performance > Minify > HTML & XML
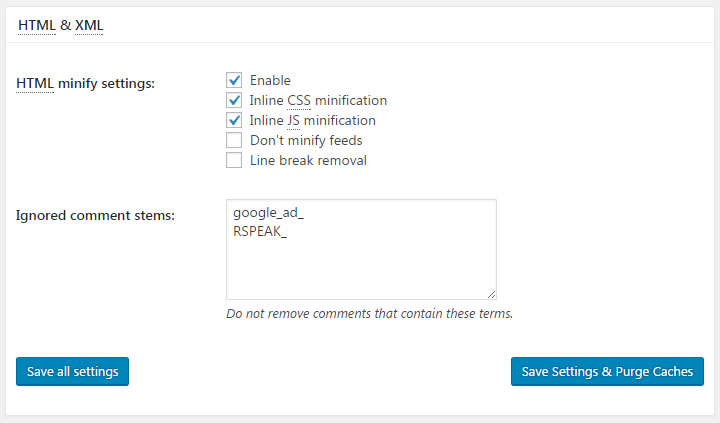
Once you have enabled HTML minify settings, first thing first is to Save and Purge Cache then head over to the homepage to check for potential issues.
If everything seems normal and sexy, move onto Inline CSS minification and Inline JS minification. These two options simply tidy up stylesheet codes and javascript codes in the page source. The last two options should be left unchecked, especially Line break removal whichg may unexpectedly mess up inline javascript runtime.
Ignored comment stems: Some script depends on comment information to run correctly. There is a chance you must look at the inline javascript on your site and decide whether to keep the its comment block to fix any related issue. Fortunately, it does not happen very often with most plugins.
Performance > Minify > JS
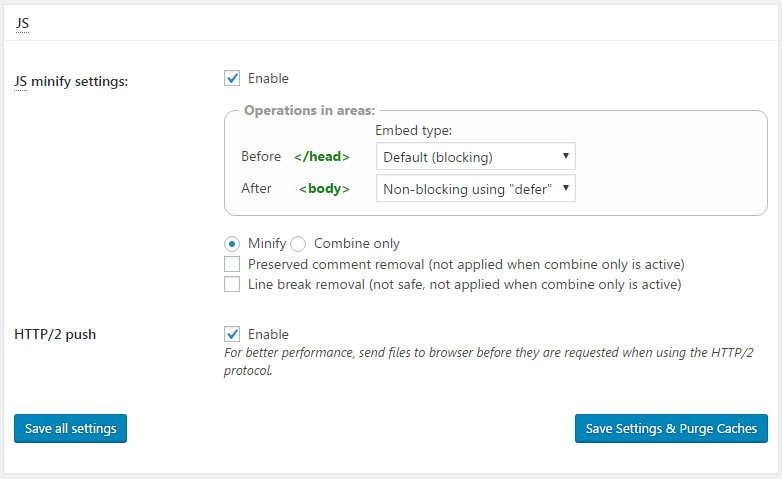
Once again, we enable JS minify settings then double check pages on the site to make sure nothing is out of order. In this section you also will be learning about a few advanced settings for Javascript positioning that help speeding up page rendering a big time.
W3TC also has a Manual Mode to manage behavior of Javascripts and CSS files on your site but it’s a lot of works. Hence we’ll talk about it later. Right now let’s learn the functionality of the basic settings.
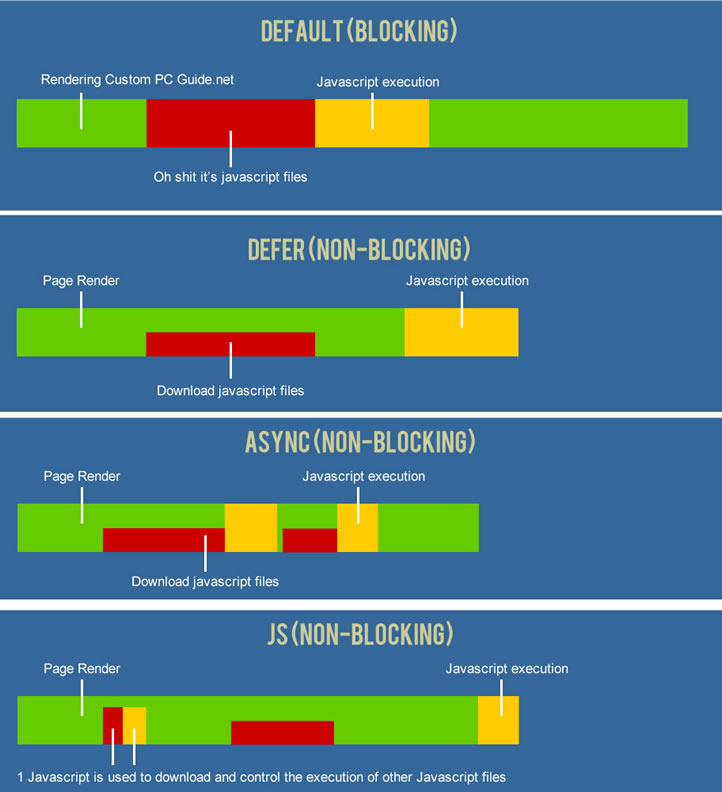
Embed type
- Default (blocking): Javascript will be fetched and run immediately, blocking the download of other resources. This method delays page rendering because while the javascripts have to be parsed and executed, everything else has to wait. Too much things going on, yet it’s the safest.
- Non-blocking using JS: W3TC creates a new dynamic javascript call that begins to download the rest of other scripts on your site in a non-blocking way –while the page continues to render. However, any javascript files that need to run at the time page load may not have chance to do so. It probably misses on-load events if there are any.
- Non-blocking using Async: Javascripts files are downloaded in parellel with page resources. Upon finish, Javascript is executed while page is being parsed, under no particular order. It can catch on-load events but it’s not compatible with most earlier verions of Internet Explorer.
- Non-blocking using Defer: Javascript files are downloaded in parellel with page resources. Upon finish, Javascripts are only executed after page finished parsing, under a queued order as they appear in the source. It should also catch on-load events or anything after DOMContentLoaded event.
It’s picture time!
Operations in areas
- Before </head> : Leave as Default (blocking) or if you are brave, do Non-blocking using Async. Check to make sure everything works fine because Async means all scripts run in an undefined order. If script 2 depends on script 1 to run, and script 2 is already downloaded and executed first while script 1 is still being transferred, shit will happen.
- After <body> : you could run test with any other options besides Default (blocking). The faster would be Defer or JS. On the other hand Async is a more lenient option, but upon download completion, it’ll slightly slow down the page rendering.
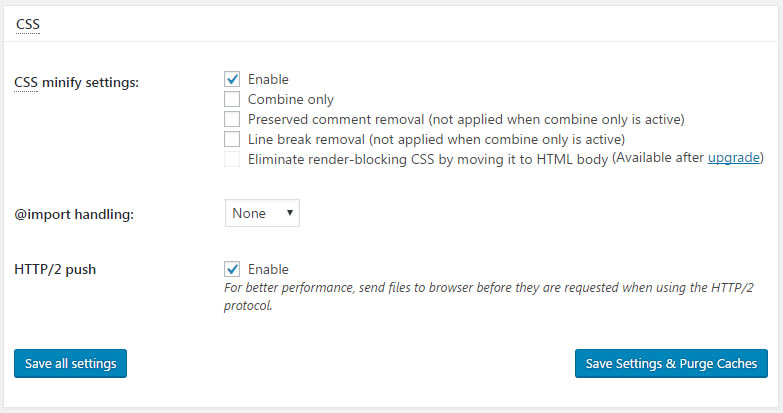
Minify or Combine only: depends on the complexity of your javascripts. Typically, combining is safer than minifying scripts because it’s less instrusive to the integrity of the codes, but file size will be larger. Checked off Preserved comment removal and Line break removal as another potential fix if you run into Javascript problems.
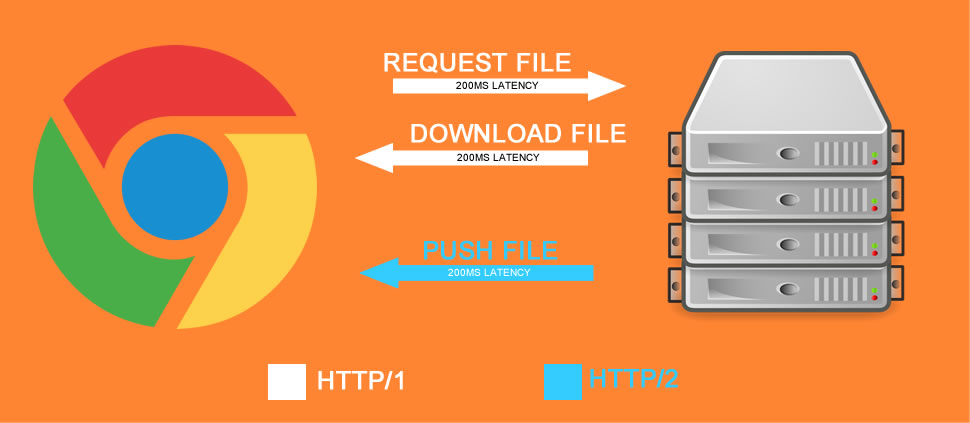
HTTP/2 push: if your host supports HTTP/2 protocol & your site is under a https connection (SSL), this will be the feature that you’ll love more than anything else –even more than the minification process itself. In plain explaination, the older HTTP/1 sends files whenever the browser requests. HTTP/2 sends files before the browser even requests them. Taking “We don’t know what we want” to a whole different level. Interested in more details? Check out this wikipedia article here.
I like to keep thing simple, so hopefully this artistic illustration helps you understand the concept at its essence.
The feature benefits our page load in several ways.
- The browser no longer have to figure out which components are needed as it scans through the HTML source because the server initiates content transfer without waiting for a request.
- All the CSS and Javascript files are pushed to the client and made ready prior to page rendering.
- Multiplexing the network streams enables your browser to load multiple files simultaneously instead of one at a time like HTTP/1.
- No round trip latency, no delay while html is parsed.
- All the headers are packed together into a compressed binary block. It gets across faster and uses less bandwidth.
- In a sense, this would work very nicely with Async embed type above.

If it is so good, what’s the catch? The browser has to support it, the server has to support it, your site has to be SSL. In the earlier days, even the antivirus has to support it too because it’s a strange new concept that posed a question: is everything the server sends SAFE? Hence now HTTP/2 only works with https secured connection to assure the “push” content are actually from the origin. Another drawback is visitors may see a blank page a tiny longer than normal if they are on a slow connection.
How to enable them on server-side? W3TC allows WordPress to take advantage of HTTP/2 for static resources, but in general your host must have this feature available in order to make HTTP/2 actually works. If you have Cloudways like us, turn on HTTP/2 via your platform panel. Consult with your hosting provider for a clear answer.
To check whether HTTP/2 is working, open a new tab on Chrome. Press CTRL + Shift + J to open Developer panel. Navigate to Network tab and start loading your site. You should be able to see h2 in the protocol tab.
Now, is http/2 really faster than http/1 ? We ran a few tests for you.
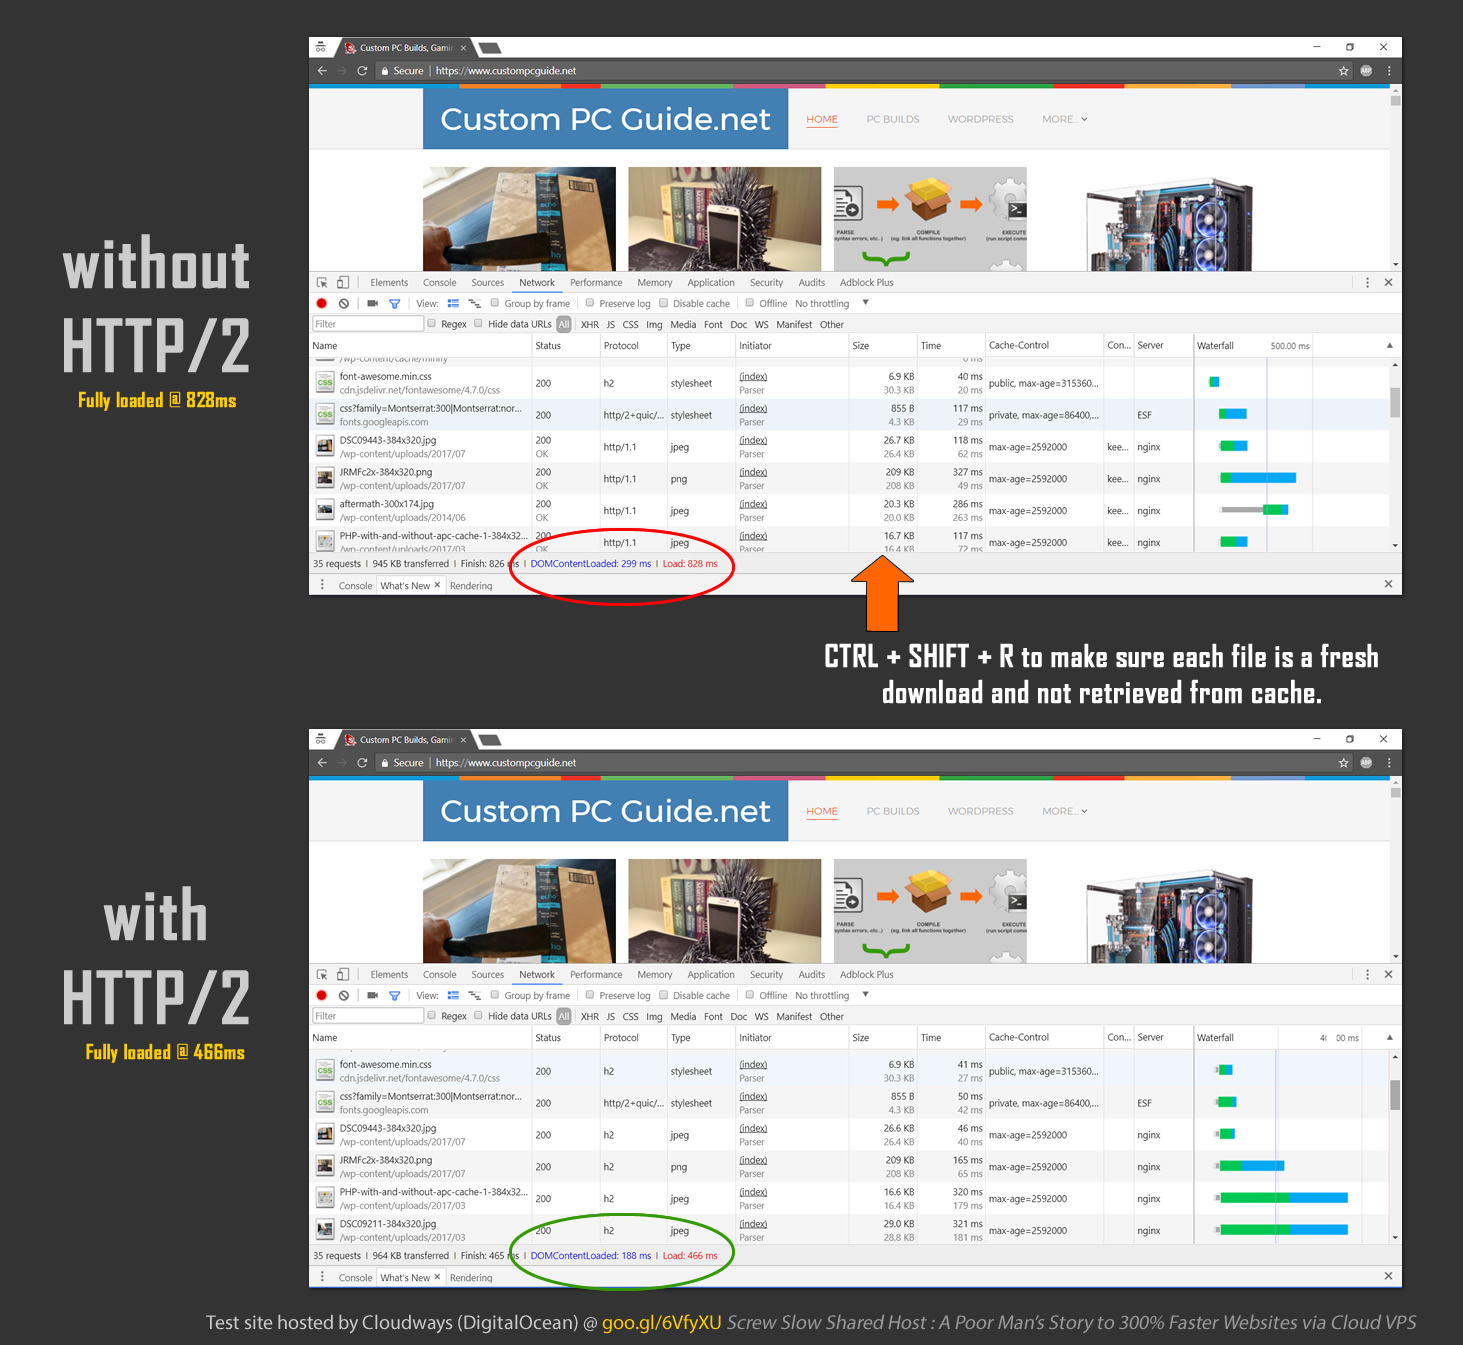
In my honest opinion, http/2 does not have a very big impact on lightweight site as it would to heavy pages (lots of scripts and images). Imagine you switch from a smaller pipe to a bigger pipe to drain a 1 gallon fish tank and a 20 gallon fish tank. Either pipe will drain the 1 gallon tank easily, but the 20 gallon tank definitely could use the big pipe more efficiently.
Performance > Minify > JS
Here are my recommended setting.
You can play around with other options, they have the similar meaning as explained in the JS section above.
- Eliminate render-blocking CSS by moving it to HTML body (Available after upgrade): this paid feature simply moves the block of CSS from the body section of your page to the very top, which forces the browser to download it first before it even starts rendering the page. That certainly helps with the “feel” for page speed, but not neccessarily improves load time.
Performance > Minify > Advanced
You should just leave everything here as is. However, here you also find a great tool to exclude javascript files or css files from being minified which otherwise may cause problem on the site.
3 – Image Optimization
 Whelp, that has been quite a long read up there eh? But you are half way into the post already, congratulations!!
Now when it comes to image optimization, image compression, etc… there are several ways to take care of them. Here are the four methods we will be going over today: EWWW Image Optimizer, Smush Image Compression and Optimization, TinyPNG and Data URI.
The first two are plugins that simply plugs and plays. The other two, with one of them being a nice little website that can compress PNG type image to a super small size without visible differences in quality. And the last one is where I’m gonna show you how to convert an image file into a bunch of code and embed directly into CSS to eliminate the need to download it upon page load.
Note: if you have exec() fuction disabled, this plugin will not work. Be sure to remove it from Apache php.ini configuration file.
Settings > EWWW Image Optimizer > Basic Settings
EWWW Image Optimizer is a freemium plugin, thus there are some features that can only be unlocked in paid version. But that does not mean you can’t take advantage of the the free edition. Though there is nothing much to be changed on this page, except for Remove metadata and Bulk Delay.
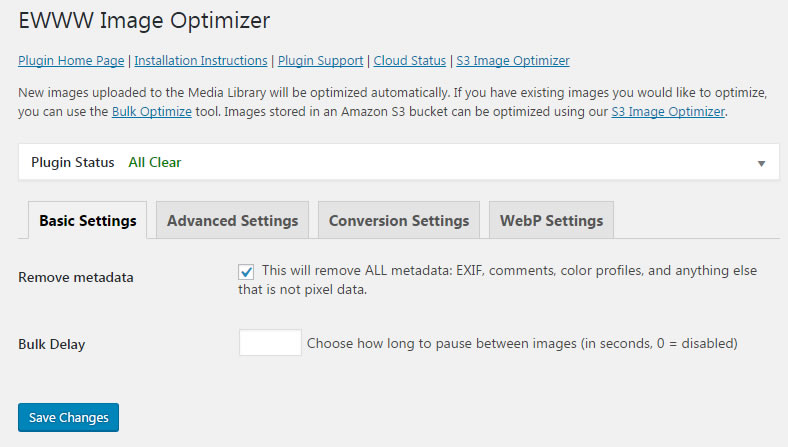
- Remove metadata: if you run a photo hosting or photography sharing website, you may want to uncheck this option to keep image data intact.
- Bulk Delay: give it 5-10s delay on a shared host environment so you don’t accidentally overload the server’s individual resource limit when executing a bulk optimization.
Settings > EWWW Image Optimizer > Advanced Settings
At the top of Advanced Settings page, you’ll see two main PNG optimization algorithms offered by EWWW Image Optimizer. The built-in open-source platform is OPTIPNG and the other one is its closed-source counterpart called PNGOUT (created by Ken Silverman). The compression levels of these platforms are much different to one another.
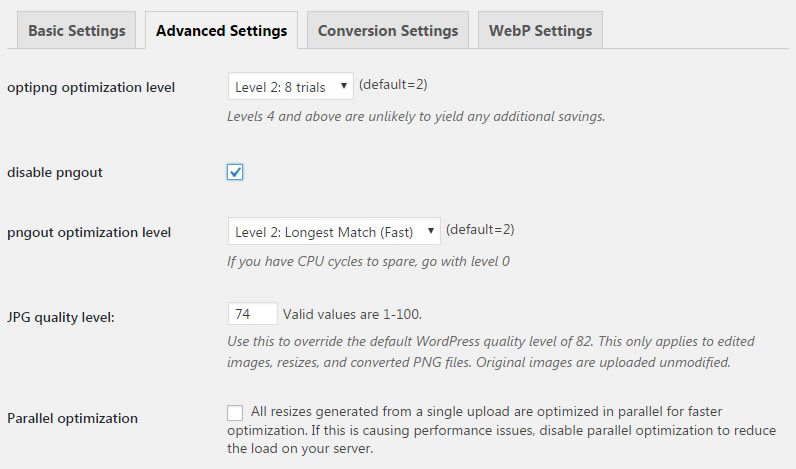
- optipng optimization level: optipng optimizes each image by running it through several “trials” where it applies different compression parameter each time. At the end of the runs, it compares all of them together and uses one that yields the best result. According to the author of this algorithm, between 8-10 trials give you the most optimal file size, more than that is just a waste of time and server resource.
- disable pngout: uncheck to enable pngout function. You will be prompted to download the pngout add-on before EWWW Image Optimizer can utilize this algorithm. As opposed to optipng where we know trials are used to determine the best result, Ken Silverman does not disclose much in detail about pngout optimization algorithm.
– At level 0 gives you the highest compression but it is very taxing on the server.
– The level 2 is most likely the right one for common WordPress site, it uses the author’s own KZIP algorithm.
– Level 3 uses the same Huffman encoding as optipng above, but on the other hand optipng also uses LZ77 encoding on top of that. Therefore, it is redudant to set pngout at Level 3 while using optipng.
– Level 4 doesn’t do jack. - So should I enable two algorithms at the same time? Only if you think it will not affect the performance of the server negatively. You may run into problem during media file upload such as time out, http error, etc…if you are too aggressive with the compression levels. Do a barrel roll and a test first. Once you have applied these settings, simply upload a new photo and wait for the automated optimization to complete. Then you can compare the online photo with its local version to see whether the detoriation level and file size are acceptable or not.
- JPG quality level: best left between 74 and 79. For higher quality you could opt for 80 and above, but file size in this range will be huge thus defeating the purpose of image optimization. If you want to enlarge, enlarge what she likes –brazzer©.
- Parallel optimization: check the box to speed up the bulk optimization process. Slow server may not approve this.
- Other settings: the rest of other options on this page can be left as is. If you need the very details of these settings, head over to the plugin’s tutorial page to find out more.
Settings > EWWW Image Optimizer > Conversion Settings
This setting automatically convert new media file from one format to another; such as JPG to PNG, PNG to JPG, GIF to PNG. I’m not sure why you’d want to perform this additonal task to consume more server resource, but if it floats your yatch then let’s do it.
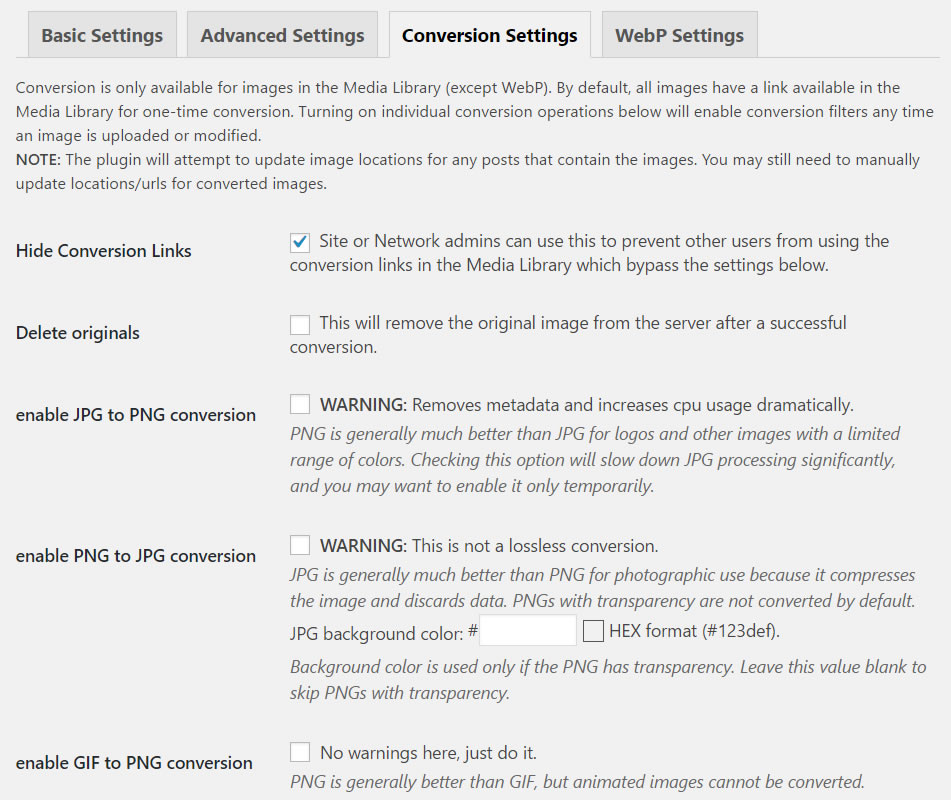
- Hide Conversion Links: There is a hyperlink for each of the image in your Media Library that allows you to do quick conversion. If you want to hide these links to other people who have access to the admin panel, check this option.
- Other settings: the rest of other options on this page are pretty much self-explaintory. If you enable JPG to PNG conversion, the next time you upload a JPG image it will be converted to PNG automatically. The same applies for the next two options.
WP Smush is another freemium plugin that works well for free users, except it’d require a little more works on our end.
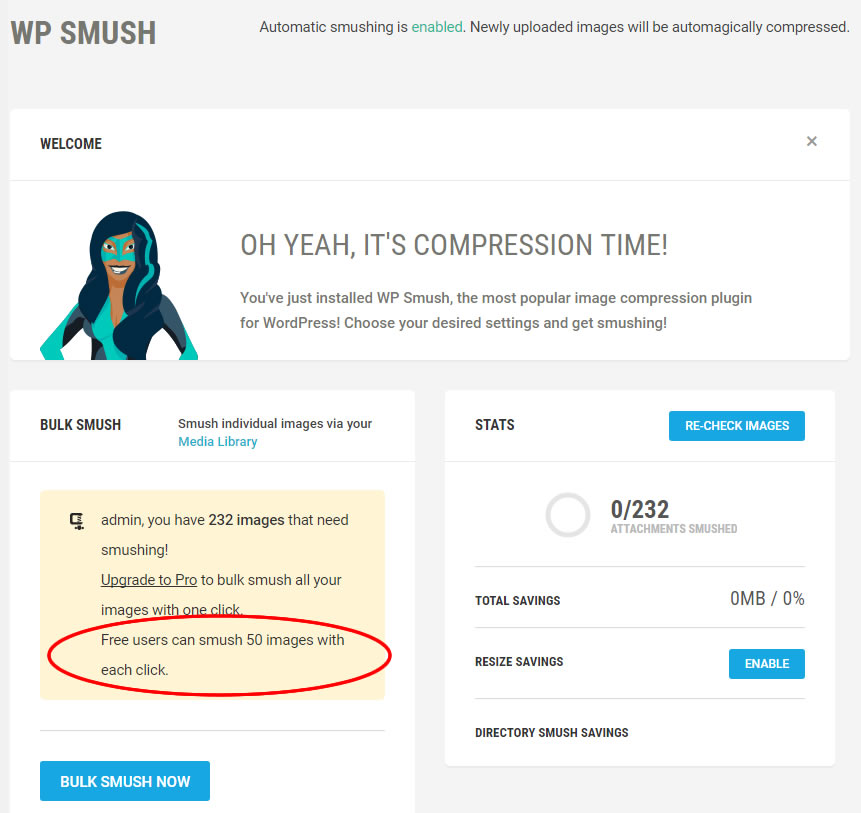
The free version has minimal options for configuration, hence in most case you only have to fire up the Bulk Smush to optimize existing media files on your site. You have to click the Bulk Smush Now button every 50 images to start the process again, which can be deadly annoying if you have over 2,000 images like I do; but it’s free! Meh.
Once you have gone through the bulk optimization, you can trust that WP Smush should work in the background and optimize any new images you should have uploaded. Be sure to verify these two minor settings down the page to your own preference.
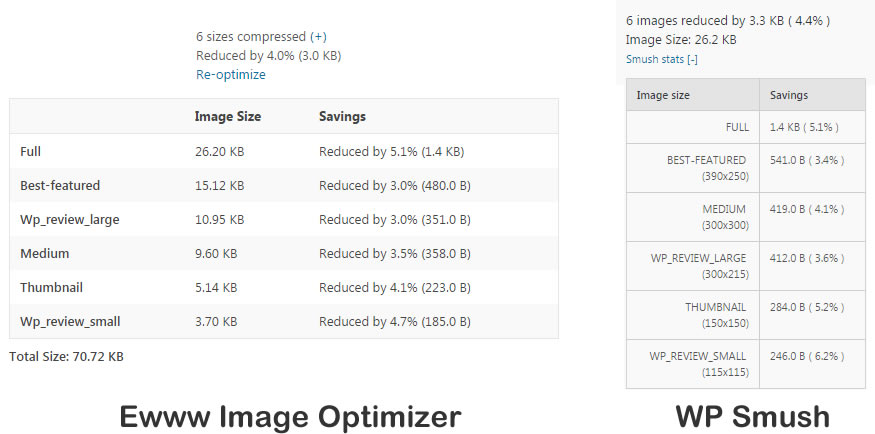
Processing images is a server-intense task. WP Smush is optimized to run under a safe condition for your host, but EWWW Image Optimizer has many advanced features that allows you to get more involved in the optimization steps with the cost of server resources if activated. Just out of curiosity, I uploaded this photo two times and optimize one with EWWW Image Optimizer and the other with WP Smush.
Here’s the result, take it with a grain of salt because only one image was tested:
This little tutorial is completely optional because it requires modification to the theme original CSS and other related stylesheet components. Once you upgrade the theme to a newer version, it’s very likely that all the works here will be overwritten and you have to start over again. If you still want to do this, be sure to keep a change log for future use again.
1. Identify theme images
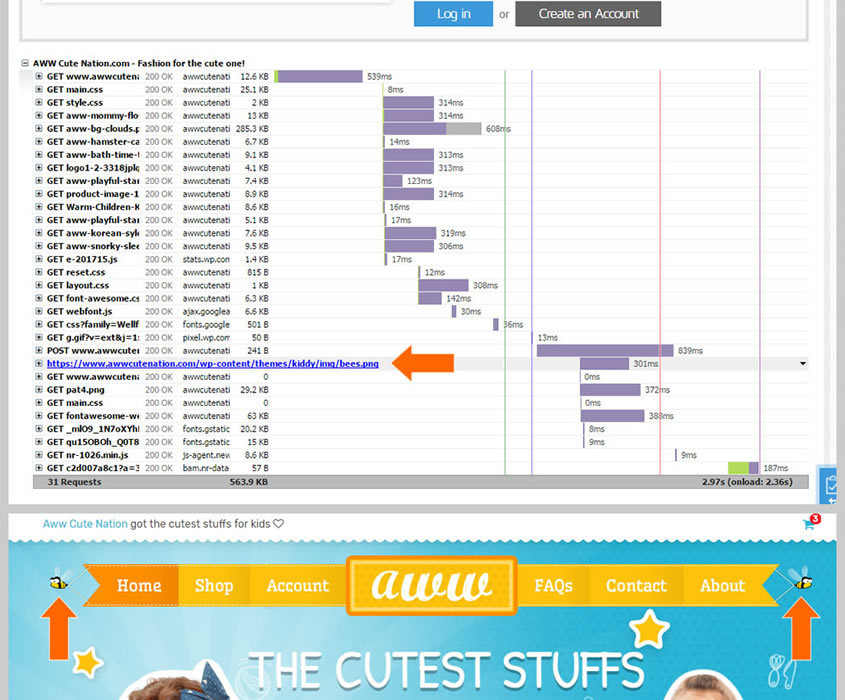
First, run a GTmetrix scan throughout your website then click on the Waterfall chart. Scroll down toward the end of the result where you should notice several small and under 50Kb images. Verify these images by following the URL, we have to make sure they are the original theme images and not user-uploaded images.
Here in my example, I found a 6Kb image of a bee (bees.png) used on my site’s main menu.
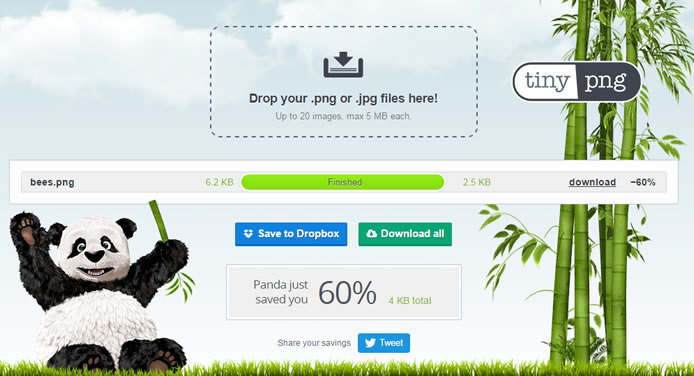
2. Optimization
Save the image to your computer. Open up TinyPNG and upload said image for optimization. In my case, TinyPNG was able to compress the bee image to 60% smaller than the original file. Now go ahead and download your optimized file.
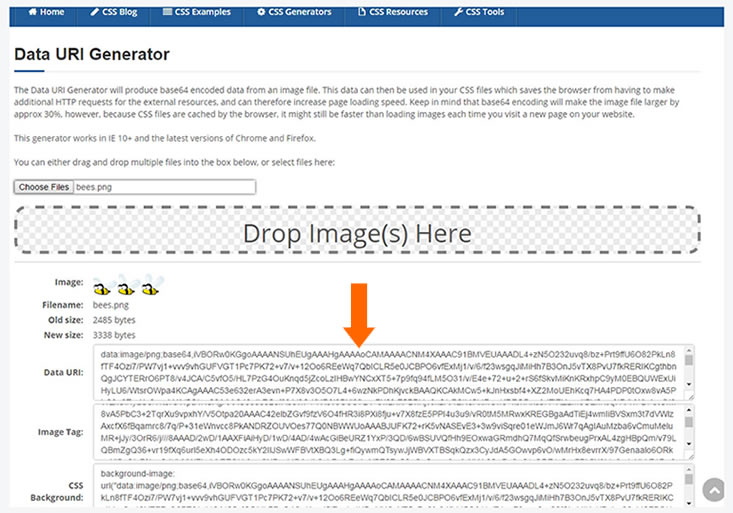
3. Image Data URI
Upload the TinyPNG-optimized image to CSS Portal Data URI Generator.
The encoded data naturally should be a little larger in size (~30% larger), but since we tuned our image via TinyPNG previously, the final size should still be smaller than the original file. Copy everything in the Data URI box.
4. Modify CSS stylesheet
This is where it gets little tricky. Some theme generates the image URL dynamically, so it’s difficult to know where the image comes from. Some even hides it deep in the source content. The most likely locations are main.css, style.css, theme header, footer and functions.php.
Unfortunately, the bee image in my example here cannot be found in any files under WordPress Admin Panel > Appearance > Editor. Meaning I have to look into the local theme source to find where the bee image is embeded.
It was fortunate for me that the bee image path is declared right in the themefolder/css/main.css.
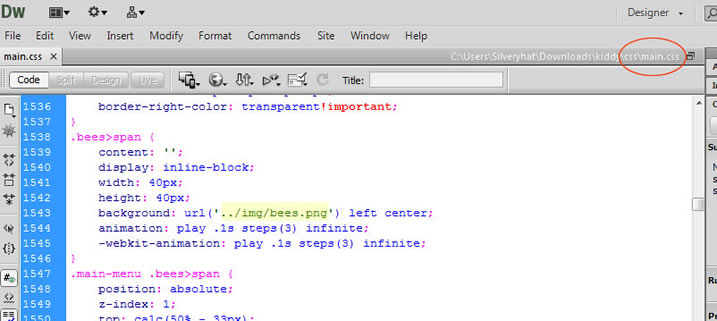
However if you aren’t so lucky on the first attempt, you will have to go through the source of every theme file to locate where the image path is.
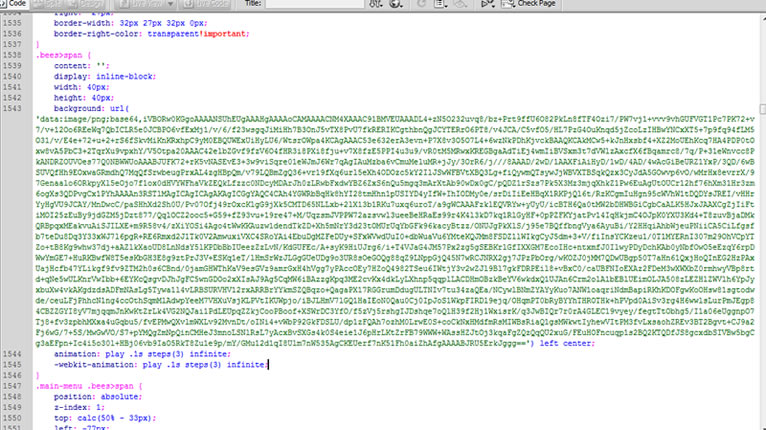
Next, simply replace the image URL to the URI encoded string you copied earlier. Save all changes and upload the file back on your server.
With all cache cleared and CDN cache purged, you should see a result similar to this via Google Chrome developer panel. That has saved your visitor 1 http request. Rinse and repeat for more http requests saved. However, you have to be careful not to inflate CSS stylesheet with heavy images otherwise it’ll cause massive slow down on page rendering.
4 – Useful Theme functions.php Modifications
In this section, I’m going to introduce you some sweet little nippets that could be added to your theme function file to increase the load speed of your site. They are just a little advanced, nothing crazy. One small mistake can cost you your site.
Apparance > Editor > functions.php
1. REMOVE DASH ICONS FOR REGULAR VISITORS
Dash icons are text-format icons you see in your post editor. It’s usually needed for webmaster use only, therefore you could exclude them for regular visitors.
2. REMOVE JETPACK DEVICE PX FOR REGULAR VISITORS
A core file of Jetpack plugin that serves super quality images of Gravatar, special icons on high-resolution retina screen. It costs you a request if you want to keep it running. If you have no use for it, apply this code to theme functions.
3. REMOVE EMOJI ICONS
Have no interest in showing emoji throughout the site? Disable them saves you at last 2 javasript requests. This tweak can also be applied using a plugin.
4. REMOVE QUERY STRING FROM STATIC RESOURCES
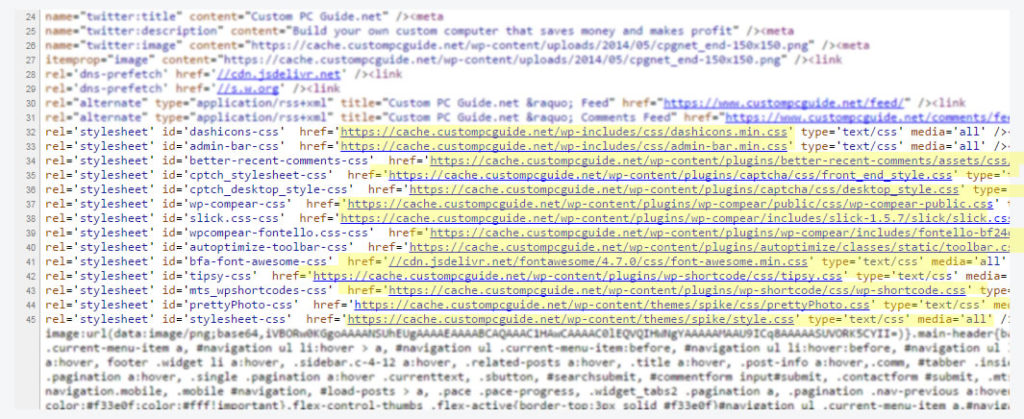
If you open up the source of your page, you may see several css and js files that have a query string that looks something like this ?ver=4.1.1, ?ver=1.0, etc..
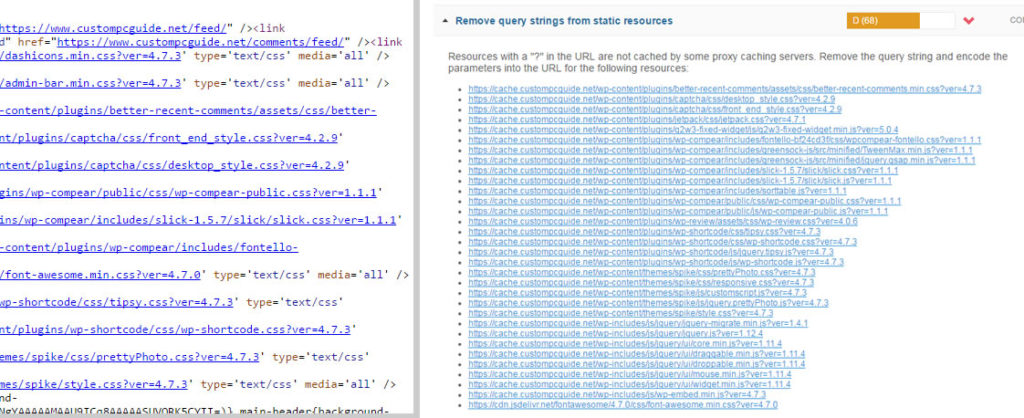
It’s good practice to have such query string during development so developer can identify and test-drive different versions of the script. However during real world deployment, having a query string in your CSS or JS means the browser treats them as dynamically generated content and the browser assumes it will be different everytime.Therefore, these files will be never be cached. NEVER!
This is a nightmare comes true for webmasters everywhere. Imagine your visitors have to download the same css and js files over and over everytime they navigate to a new page on your site. They’ll bounce before it’s even finished loading!
5. DISPLAY ENQUEUED SCRIPTS ON THE PAGE
Adding this line to functions.php forces WordPress to print out the list of enqueued scripts running on the current page. It’s helpful when you need to decide whether to remove an unncessary script from a page to speed thing up a little.
6. REMOVE LOCAL JQUERY AND LINK TO GOOGLEAPIS SERVER INSTEAD
If your host is slow and you don’t have a CDN nor Cloudflare, one thing you could do to lighten up page content is remove the biggest local script on the site: jquery. You then can link to the smaller, minified jquery package hosted on Google APIS Library server –which itself is also a CDN for fast distribution anywhere in the world. Meaning there is a chance the jQuery now loads even faster than your page.
Before adding this code to theme functions, have a quick look at your page source to determine the current version of jQuery on your website. Replace 1.12.4 below accordindingly.
The cons of this method is you have just created an additional request on your page; while a local jQuery could have been merged into a single minified file along with other JS via Autoptimize or W3TC. You have to make a choice here, whether your local host or Google server is anychance, faster?
7. REMOVE WOOCOMMERCE AJAX CART FRAGMENTS
If your WordPress is running Woocommerce plugin but the homepage does not have this little shopping cart icon, you can remove this particular Woocommerce Ajax call that’s used to verify cart item altogether.
It will save just only 1 request but this time it is something that’s worthwhile. Because the call usually has a high delay response, everytime. 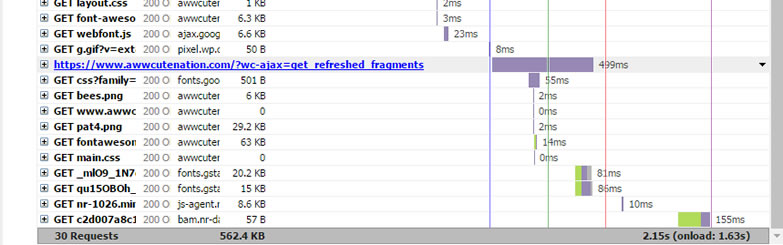
5 – WP Cron and Heartbeat
This could become a problem for high traffic websites because for every 10,000 visits there are nearly as many requests to just check whether there is anything to do. It’s a waste of resource and during traffic spike may lead to a huge slow down for your site. Therefore we will disable WP Cron and setup a server cron in place, where it runs at a specific hour of your choice, everyday; recommended at night where there is less traffic instead of at random time.
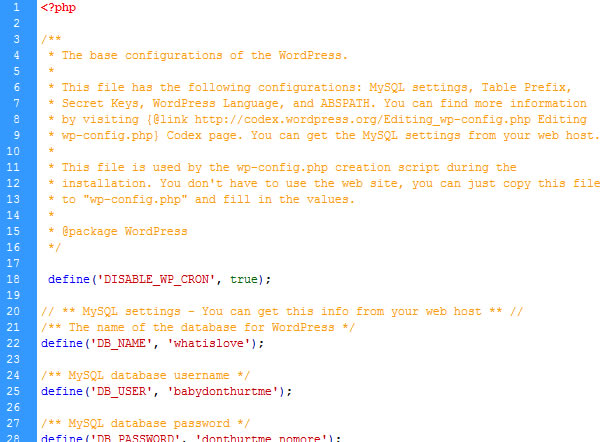
First, open up wp-config.php. FTP program such as WinSCP allows you to edit the file live hence if you haven’t known about this software yet, give it a shot.
Now add this line to your wp-config.php.
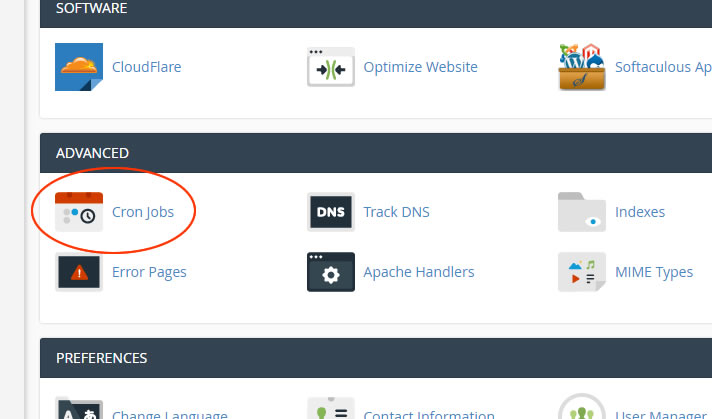
Once WP Cron is disabled, head over to your cPanel so we can setup a server cron. I will also go over how to setup a Cron job with Cloudways after this as well.
Apply the following settings.
- Email: I recommend you have this field filled just so you know when the cron job has run successfully.
- Common Settings: Pick the time you prefer to have the Cron job run. I first choose Once a day from this list, then slightly customize the hour below to 2AM instead of midnight. Be sure to set your server timezone to your local timezone for accurate execution time. Some shared host plan does not allow you to configure this, but it’s not a big deal.
- Command: be sure to replace yourCpanelusername with your own assigned cPanel username.
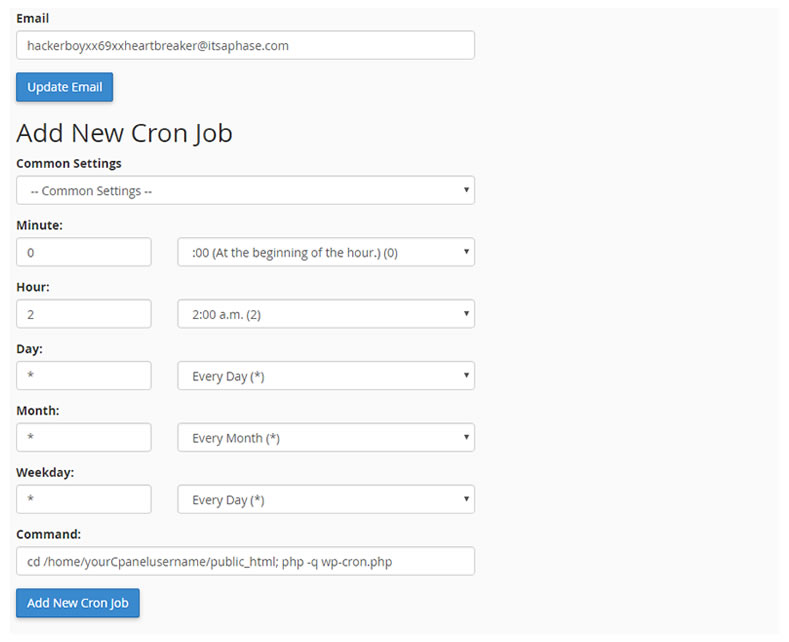
Hit Add New Cron Job and you’re done! Not too difficult, isn’t it? Now let’s tackle the Cron Job for those who use Cloudways.
Login to your platform dashboard > Settings & Packages. Here you can set the timezone for your server.
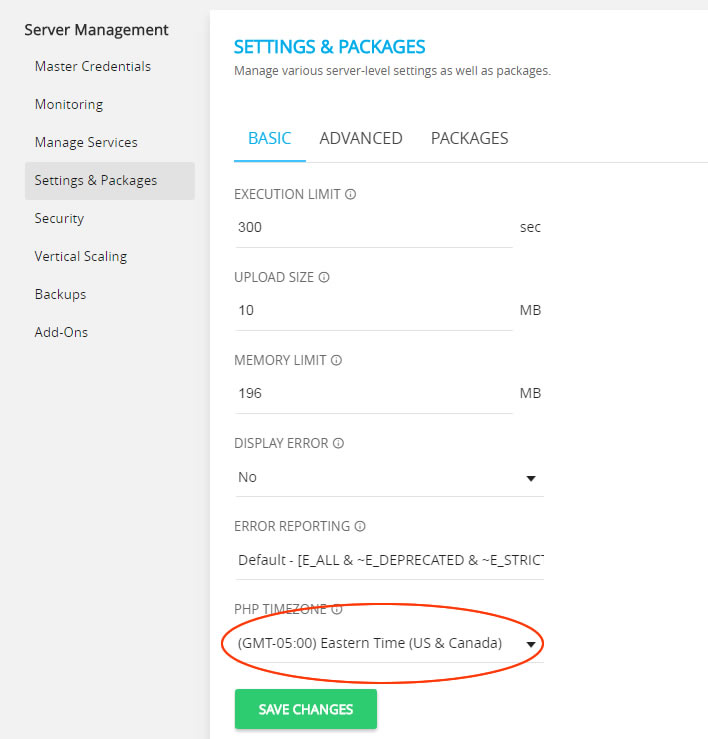
Head over to your site application > Cron Job Management. Click Add New Cron Job and choose Once a Day from the Common Setting.
Navigate down to Hour and pick 2, so the Cron Job starts around 2AM every day.

Finally, scroll down to the bottom of this window and add
to the Command input.
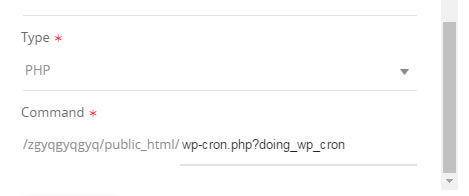
Then you’re all done here. You have just done a huge favor for your server.
Fundamentally, WordPress Heartbeat a.k.a WordPress Heartbeat API is an interval command that runs every 60s or 120s to establish an asynchronous communication between admin’s browser and WordPress site. This communication allows WordPress to perform many admin-privileged activities such as keeping track of post revision, auto saving during editing, check whether if someone else is editing a post, etc…via admin-ajax.php.
If you are a fan of GTmetrix, you’ll notice that admin-ajax.php oftens appears on the waterfall chart as one of the slower culprits. Because it always delays load time for no reason. By taming the Heartbeat API, you’ll also reduce the requests made by admin-ajax.php so it not only improves server performance, but also improve load speed for common visitors to your site. The process is very simple.
- Install Heartbeat Control plugin.
- Allows Heartbeat to function on Post Editor pages only.

Under this setting, the visitor’s browser no longer bothers the server every one minute for tasks that are only important to web admin. In fact, now Heartbeat only runs on web admin’s post editor page as needed. However some plugin may rely on Heartbeat to work properly, so you have to keep this tweak in the back of your head. If something doesn’t go right in the future, you know where to look first.
6 – Other Tips
Those who use WP Super Cache may find yourself missing a few Browser cache features; such as header control, gzip compression for instance.
W3 Total Cache has these settings built-in and we have gone over them in Step 1. So folks who are using W3TC, you can now skip this section and go on your own way. You’re done here, remember to delete the URL but don’t stop believing. Though you may miss the part where we talk about Cloudflare below.
Unless you already know.

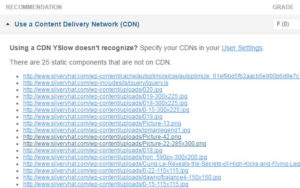
This could become a problem here because if you have more than 10 different components embeded, it will take a very long time to download them all since the browser has to open then close then open connection again for each file.
Imagine you order three refrigerators from Amazon and every one of them comes in different UPS truck at different time instead of just one. It gets expensive very quickly. Enable Keep-Alive allows browser to pick up all these files in one connection thus could improve performance by 50% or more.
A lot of online forums share this method of adding a keep-alive header control to .htaccess file in the root folder like this:
But it may not work because Keep-Alive is a server side configuration. Instructing the browser to believe Keep-Alive is on, while the server does not have this feature enabled only confuses it even more.
You could try the method above on your own, but the proper way to turn Keep-Alive on is by editing /etc/httpd/conf/httpd.conf file. Most shared hosting plan does not allow access to this file unfortunately. Yet if you could, apply these following settings:
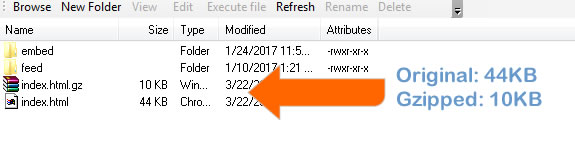
Similar to your every day .zip file, a .gz file is anywhere between 30% to 80% smaller than the original file. Upon receiving the .gz file, the browser automatically extracts and displays the component for your viewing pleasure. Gzip saves you a lot of bandwidth and it’s one of the easier settings you could do to effectively improve the load speed for your site.
Add the following lines to .htaccess file.
When a browser downloads something from your webpage, it follows an instruction (header) in order to manage these elements’ behavior. Simply put, if the header is empty or the header tells the browser not to keep certain image or css stylesheet, the browser will not keep them. That means everytime visitors navigate to another page of your website, they have to wait for the browser to download all of these again.
This policy is great for dynamic page where content is changed often, but it is extremely bad for static files such as pictures, stylesheets and javascripts. These components most likely don’t have to be downloaded over and over again. Once the browser has them, they should be cached a little longer to save time and bandwidth in case the visitor wants to check out another page in the future.
Add the following lines to .htaccess file.
 At this point, your website should have reached at least the 80% score on GTmetrix if that’s something you care about. The next step is to decide whether to use a CDN to deliver your website content or put it behind a proxy CDN like Cloudflare.
Now Cloudflare is free and it’s an excellent CDN. I personally use it to manage Domain DNS. However because it is free, there are a few disadvantages –such as:
- Limited options when it comes to header control.
- Minor problem with “cookie-less domain” because Cloudflare adds a layer of security by populating all your web content with cookie header.
- The delivery route sometimes might not be the best and the fastest route, because Cloudflare determines which one is the most cost-efficient for them.
- Recent leakage of sensitive data mixed from multiple sites across Cloudflare network. SSL cert is shared between many sites.
If your website is not an ecommerce website storing important users’ credential data, then I suggest implement Cloudflare. Its free plan is the best for starter. If you prefer a paid CDN for better features and security, follow this guide we posted the other day. Don’t worry it costs pennies on the dollar.
 Affordable CDN Roundup: KeyCDN, BunnyCDN and BelugaCDN vs. Amazon Cloudfront
You’ll learn in great detail about CDNs and how it works, along with several benchmarks that reveal which one is actually better than one another. Keep this page open and come back later because it’ll be another long read over there!
 WordPress hates bloated database. Everytime your database becomes bloated, WordPress runs like it has been constipated for two weeks. Eventhough WordPress itself is the reason why the database is bloated (sounds like a 10-year marriage).
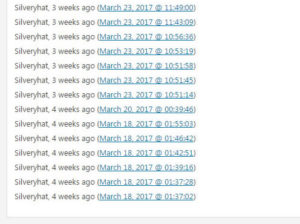
But on a serious note, this article you’re reading has nearly 100 revisions by itself, it took one month to put everything together. Anyway, everytime you edit a post WordPress would save Revision and create an auto-save every minute.
Some website advises to disable post revision and increase auto-save to 5 minutes, but personally I dislike that recommendation. I have been saved by the Auto Save feature more than a dozen times and it saves me a lot of frustration.
However, you live life on the edge then add the lines to wp-config.php:
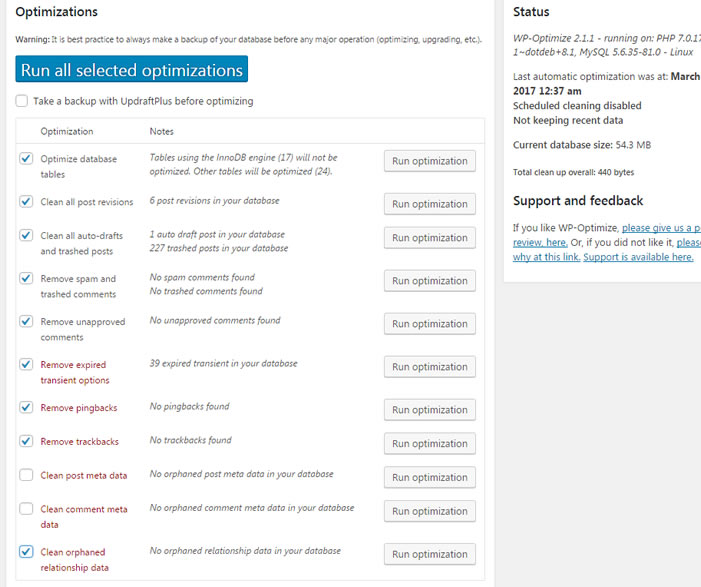
Next, install WP Optimize plugin on your site. Once that’s done, fire up the optimizations.
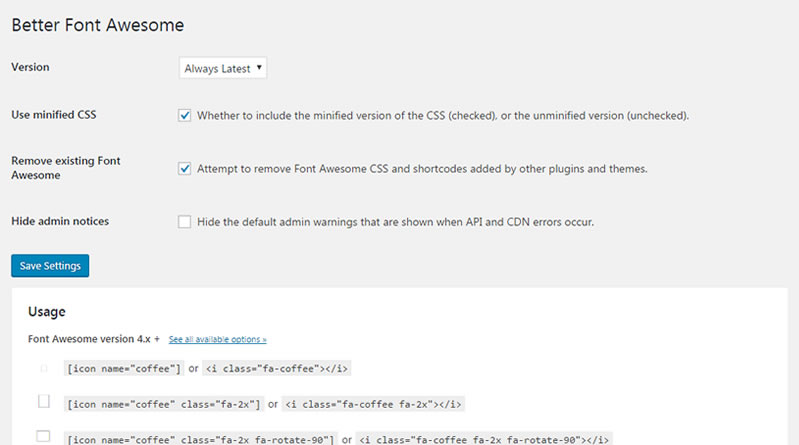
If you are having trouble displaying Font Awesome icons in your post because WordPress keeps removing the empty em tag, I recommend to install Better Font Awesome. This little plugin does several improvement to the theme original Font Awesome by:
- linking to a faster font awesome CDN host
- allowing safe font awesome in post by shortcode
- minifying font awesome script and css
It should give your site a tiny speed boost if that’s something you’re concerned. It also has the option to remove the theme’s slower Font Awesome css in case you don’t want to do manually.
On the other hand, if you want to avoid more plugins on the site then you can replace your theme Font Awesome css with KeyCDN’s faster css. This is a lot more works because you will have to look in Appearance > Editor > header.php or functions.php and find out where the Font Awesome css is linked.
Then replace the url with:
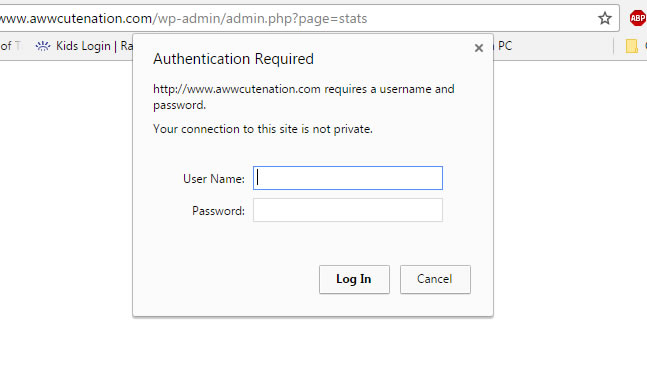
Adding the above code admincp > admin.php > under <?php will force the browser to ask for a preset user name and password before you can proceed to Admin CP. It’s a great way to stop brute force attacks on the admin login page. However, it may not work for all hosting environment. Make sure you can revert the code change if thing does not perform.
Upon first load, the browser has to wait for Google Font to download before it can renders the text on the the page properly. During this period, there are usually white spaces everywhere. While it may not affect performance, the blank canvas could make a negative impact on your visitor’s browing experience. It essentially gives the impression that your website is taking forever to show up.
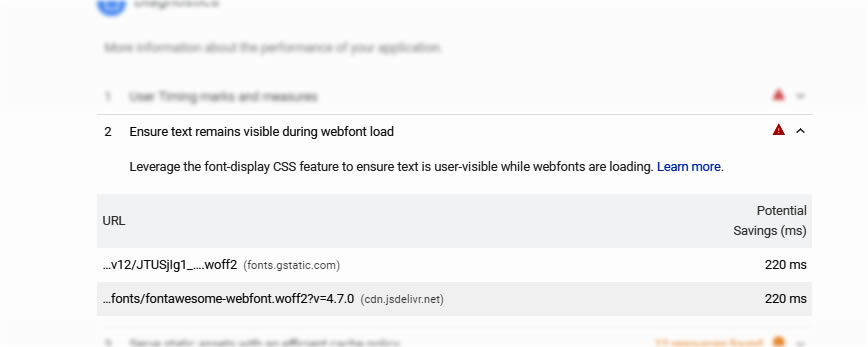
To fix this problem, simply find the font-family or font-face declaration in your style sheet and then add font-display CSS attribute right before the end of the style. For example:
In this line…
Add before the closing delimiter.
Other values include fallback, swap, optional and auto. Wonder what they do? Read the explanation here. Another way to address the webfont load visibility issue is apply this code to the stylesheet directly.
7 – Get a Good Host
 Having a fast host makes a lot of difference. Can’t stress it enough. That $2.95 shared host will make you lose thousands in the future.
All the effort will go in vain if you just religiously follow every single step above yet your shared host server is overcrowded and it does nothing but slows down your site to the crawl.
Read about my nightmare with Hostgator and how I moved all my sites to a cheaper, $10/mo super fast Cloud VPS here. I’ll also show you how to go as low as $3.50 via Vultr + Runcloud combination and still come out ahead of all shared host sites.
I only regret that I personally didn’t do it sooner until the day Google started dropping my site rank to the sink hole. Good luck and share with us any other tricks that I might have forgotten here!
Wordpress Optimization Guide explained...
You are reading one part of the whole Poor Man Fast Website series; where we often share tremendously valuable advice regarding the best low cost, most questionable hosting services along with many confusing website development tips and shady speed optimization tricks for the Wordpress platform. Just kidding, you'll see.
Along the way we may decide to make the worst jokes that I'm certain you'll find a year of cringiness supply here in the garage. The rest of them will make you wanna go to bed and start the day over. Believe me. Also once you have followed every technique in here to improve your site, better delete the URL of this page, clear the last 4 week browser's history and hide it from your wife, your kids, Thanos and everyone else. Treat it like Captain Marvel. And you're Fury.
Nice article. Image optimization is a big one. It can really make a difference in page speed.
The topics is really recommended for me to save loading speed on my money site! Thank you for advance :)
This is truly on of the best articles I read about wp optimization .
Thank you so MUCH ( why am I shouting ? ) for this amazing AND detailed article. A piece of art seriously.
I have looked and read about these optimization tips and stuffs many times, some good, some bad some wtf and yours is a top notch one.
What a job.
Love the humour between the serious lines.
Keep up writing and informing us this way.
Have to go, so much job to do on this optimization road.
Cheers,
R.
Thank you so much for the feedback, check back often since I will update the guide almost every month for new tips!
Excellent guide, thank you. There were a couple things in the W3 Total Cache guide that are a little outdated, but not too bad (like test now). Also the section title for Minifying CSS says “JS”.
Quick question with this setup as someone coming from WP Rocket… do you have any recommendation for a user-based cache? I run a multivendor e-commerce where people are logged in all the time. Or, is this not necessary with the rest of the tweaks given? Seems hard to test. Anyways, thanks again!
We don’t often cache cart info for logged in users because it might pose a security risk. However, this does not mean everything isn’t cached for them; obj cache, redis and varnish caches (if available) still work fine on their part of the page rendering process.
This code is getting errors when adding it into my Simple Custom CSS editor/plugin:
Any ideas on how to add this code into my style sheet editor without getting invalid syntax errors? Also, I”m pulling my fonts locally so the code I’d like to use I think should look like this:
Great article BTW
Hi John, please wrap your code between the ` or they will be filtered out. More info.
<html> this.is.an.example;</html>Awesome guide! Very detailed and practical. Thanks for sharing.