Solid State Drives are the latest and the best tech in the PC world that can truly stretch the performance of any typical computers further than anyone ever could with mechanical drive. While it might be a new thing to many, SSD is already a must-have among the enthusiast computer builders.
You will certainly notice the difference in speed and system responsiveness simply by replacing your mechanical boot drive with a decent SSD. Today, let’s find out how to prepare the best home before we set out to adopt a SSD.
The ideal setup is to set Solid State Drive as your main drive where it houses the Operating System, Programs and small personal files that are accessed daily; while utilizing a mechanical hard drive as the secondary storage to keep all other documents, music, videos and data that are not used often.
As the result, you will gain a healthy boost in performance for your computer; since the most stubborn bottleneck of computers –storage transfer rate– has been remedied. You also receive the benefit of lower data loss rate as when the OS drive goes haywire, it does not take all the eggs to hell
…And why hell you ask? *cough* browser history *cough*.
Now, there is no difference between SSD installation and regular hard drive installation. The most difficult step is making sure your Operating System supports the TRIM command –a function that automatically cleans up old and expired cluster data on SSD cells. But most modern SSDs support this feature at their own hardware-level known as Garbage Collection.
Moreover, even though SSDs are fast they do require some special care, too. Follow these 3 easy tweaks below to guarantee a happy life for your SSD and/or data.
1. Use the correct SATA port on the Motherboard
 If your SSD specification states that it runs at SATA III 6Gb/s speed, be sure to use SATA III cable and plug it in to the SATA III port on your motherboard. This port is usually marked and appears in different color to the rest of other SATA ports.
Some older motherboards may not have SATA III interface and you can simply use SATA II or SATA I port, but it will strictly limit the potential transfer rate of the Solid state drive by half or fourth.

PCIe Slots
On other hand, if you really do not want to settle for less when your motherboard only has SATA II, you can easily install an add-on SATA III card onto your motherboard (1 PCI Express Slot required) and the system will fly. You can browse some inexpensive options from our recommended list here : SATA III 6Gbps PCIe Cards.
2. Configure SATA Interface as AHCI Mode in your BIOS.
AHCI means Advanced Host Controller Interface. AHCI has two main benefits: supports native command queuing (NCQ) and hot-swappable. NCQ allows the SSD run at its full potential. Hot-swappable is nothing related to increasing speed of SSD but if your computer case has an External hard drive bay, you will be able to hot-plug the hard drive without having to restart the computer. This could be a great time-saving trick for those who need access to multiple drives often.
AHCI can be set via BIOS configuration and it should be done before installation of Operating System.
If you did not do so at the beginning and already had Windows installed, here is the easy trick to enable AHCI Mode after Windows 7/Vista setup :
1. Hold Windows key + R, type in Regedit. Follow the structure to HKEY_LOCAL_MACHINE / SYSTEM / CurrentControlset / Services / msahci
2. Look on the right window, and double-click on Start. Change the value to 0 (number zero) and confirm.
3. !Important: Restart your computer. Do not go back to Windows. You must also access your BIOS Setup and change the SATA Mode to AHCI.
If you do not know how to change to AHCI Mode, refer to your motherboard manual.

AHCI Configuration using ASUS BIOS UEFI Interface
3. (Windows Only) Turn Off Virtual Page File
Virtual Page file is a cache file for Windows to keep its temporary data. Virtual Page file is designed to accommodate with system memory (RAM) years ago, because back then the amount of memory was just insufficient to keep up with all the extra data being generated from applications. In modern computer, there are usually at least 4GB of RAM and more than 8GB on a gaming computer. Therefore, we do not need to stress the SSD with Virtual Page file anymore.
Instead, we can safely turn it off which then forces the system to allocate the cache to RAM.
The purpose of this tweak is to free up space on the SSD, reducing read/write processes thus increasing the lifespan of SSD NAND. It also speeds up performance by having temporary files stored on system memory.
Changing Paging file otions
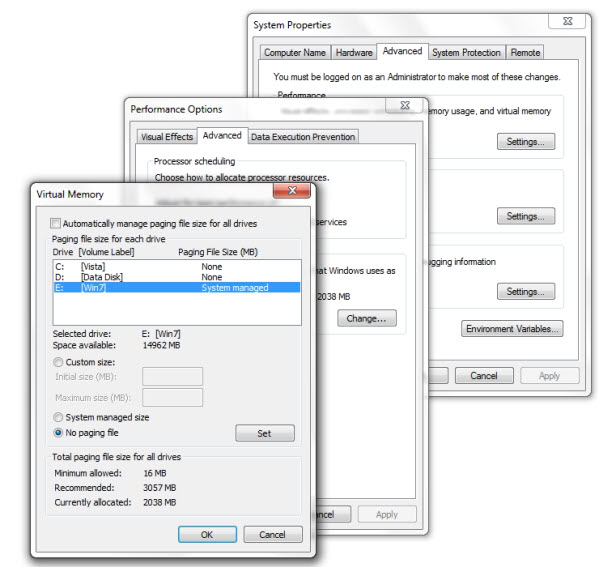
- To do this, first hit Windows key + R, then type in and run SystemPropertiesAdvanced , now click the firs Settings button.
- Switch to the Advanced tab and click Change. Uncheck Automatically manage paging file size for all drives.
- For each corresponding drive (especially SSD), make sure you chooseNo paging file option and click Set.
- Finally click OK to save all settings and Restart the computer.
And that concludes the 3 steps to to optimize your SSD. Got more crazy advice ? Share with us in the comment !